FAQ
What to do if the Windows 5UF app cannot start or has cache issues 
If the Windows version of 5UF APP does not respond, crashes, gets stuck, or fails to open, the cause is often damaged local cache data.
Recommended steps:
- Fully exit 5UF VPN and make sure no tray icon remains.
- Open
C:/Users/YourWindowsUsername/AppData/Roaming/com.top.wuf. - Delete the cached files in the
com.top.wuffolder. - Restart the computer.
- Right-click 5UF VPN and choose Run as Administrator.
If it still cannot start, contact support and provide your Windows version, device model, screenshot of the error, and the time when it happened.
If you are still using an older client, we recommend switching to the latest 5UF VPN app for better stability and compatibility.
TUN Mode vs System Proxy
- TUN mode creates a virtual network adapter on your device, intercepting and forwarding all traffic at the network (IP) layer. This ensures that all apps and services — even those that don’t support proxy settings — are routed through the VPN.
- Advantage → Full system coverage for all traffic.
- Limitation → Because it works at the routing level, connections may be less stable under certain devices or network environments.
- By attaching your system’s HTTP proxy directly to the VPN service, System Proxy offers a more stable and consistent connection.
- Advantage → Smooth, reliable, and stable performance.
- Limitation → Because some apps and websites do not support proxy mode, they may still be blocked in certain situations.
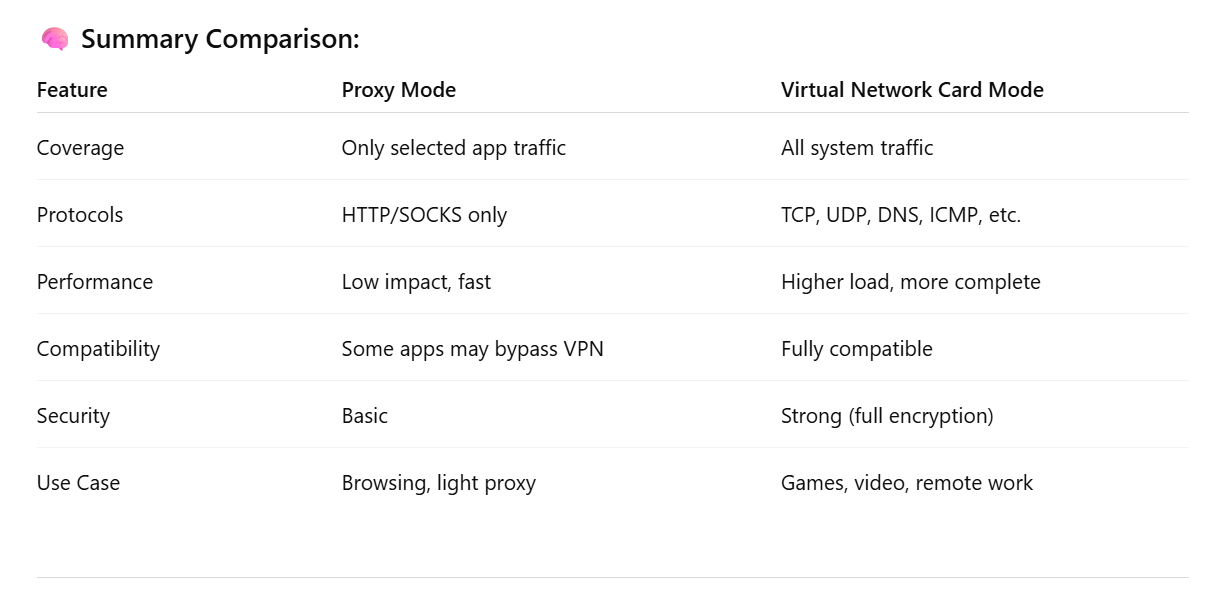
Difference between Virtual Network Card Mode and System Proxy Mode
? Simplified Explanation: Two VPN Modes
? 1. Proxy Mode
✅ What is it?
Only sends specific apps’ traffic through the VPN — like browsers or apps that support proxy settings.
? Key Features:
-
Works only with apps that support proxy protocols (like HTTP, SOCKS5).
-
Other apps on your system don’t go through the VPN.
-
Faster and lighter on system resources.
-
Some apps (like games or built-in network tools) might bypass the VPN.
-
More flexible — you can choose which apps use VPN and which don’t.
? Best For:
-
Browsing websites
-
Light or casual VPN use
-
When you only want to route some traffic through the VPN
? 2. Virtual Network Card Mode (TUN/TAP Mode)
✅ What is it?
Creates a virtual network card and takes over all traffic on your device, routing it through the VPN tunnel.
? Key Features:
-
Sends all traffic (web, apps, games, system services) through the VPN.
-
Supports all protocols: TCP, UDP, DNS, ICMP, etc.
-
More secure and complete coverage.
-
Uses more system resources than proxy mode but is more stable.
-
Common in VPNs like OpenVPN, WireGuard, L2TP, IKEv2, etc.
? Best For:
-
Streaming video
-
Online gaming
-
Remote work / accessing company networks
-
Full security and encryption
How to Create an Overseas Apple ID (Hong Kong) from Mainland China
Need access to apps that aren't available in the Mainland China App Store? Here's a simple step-by-step guide to help you create a Hong Kong Apple ID right from your iPhone — no VPN needed.
Step 1: Go to Apple ID Website
-
Open Safari (or any browser) and go to https://account.apple.com/account#
-
Click “Create Your Apple ID” in the top-right corner.
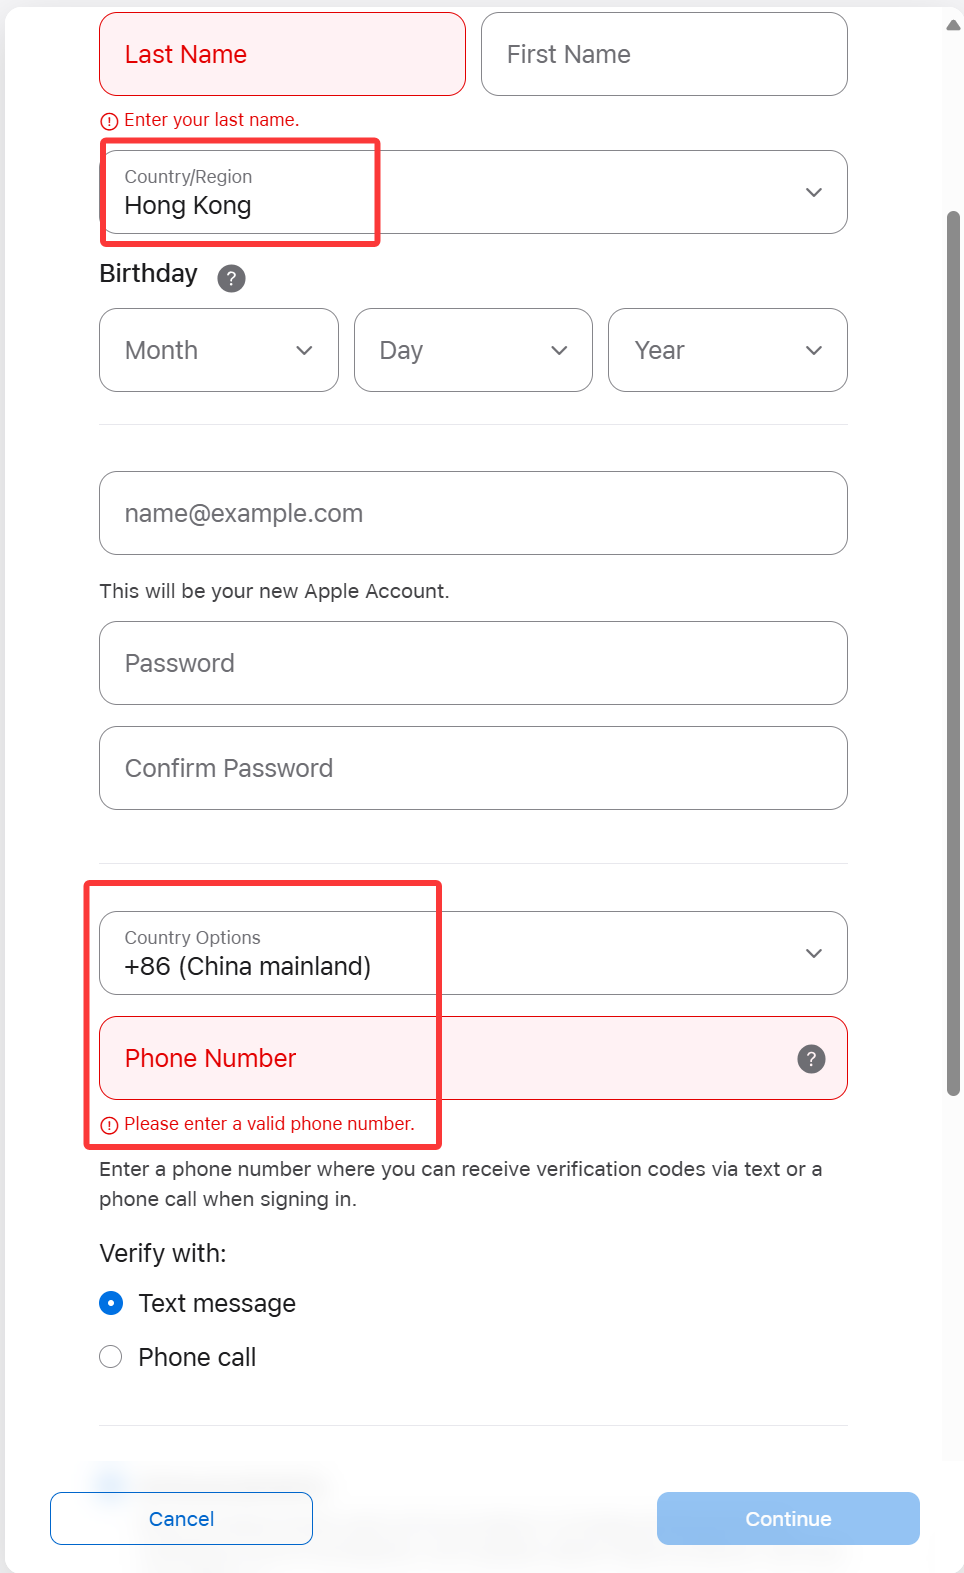
Step 2: Enter Your Details
-
Fill in your first name, last name, and date of birth.
-
Enter a new email address (one that hasn’t been used with Apple before).
-
Choose a strong password.
-
Set your country or region to Hong Kong.

Step 3: Add Your Phone Number
-
Use your Mainland China mobile number — it’s fine!
-
This number will receive a verification code, so keep it nearby.
✅ Apple allows you to verify an overseas Apple ID using a Chinese phone number.
Step 4: Set the Billing Address
-
For the billing address, you can use any valid Hong Kong format.
-
Feel free to randomly fill in the address fields — just make sure it's realistic:
-
Example:
-
Street: 88 Queensway
-
District: Central
-
City: Hong Kong
-
Postal Code: 000000
-
Phone: +852 6123 4567
-
-
-
For payment method, choose None if it’s available.
User feedback
Some users report that None only shows when their traffic exits via a Hong Kong IP (for example, after connecting through a Hong Kong VPN node). If you still can’t set None on a phone, try a desktop browser on a network with a suitable exit (e.g. Hong Kong) and complete your Hong Kong Apple ID at account.apple.com, then sign in on the iPhone.
Tip: You can also use a Hong Kong hotel or store address for convenience.
✅ Step 5: Verify and Complete
-
Enter the verification code sent to your phone number.
-
Apple will also send a confirmation email — open it and click the link to verify.
-
Once verified, you can sign in with your new Hong Kong Apple ID.
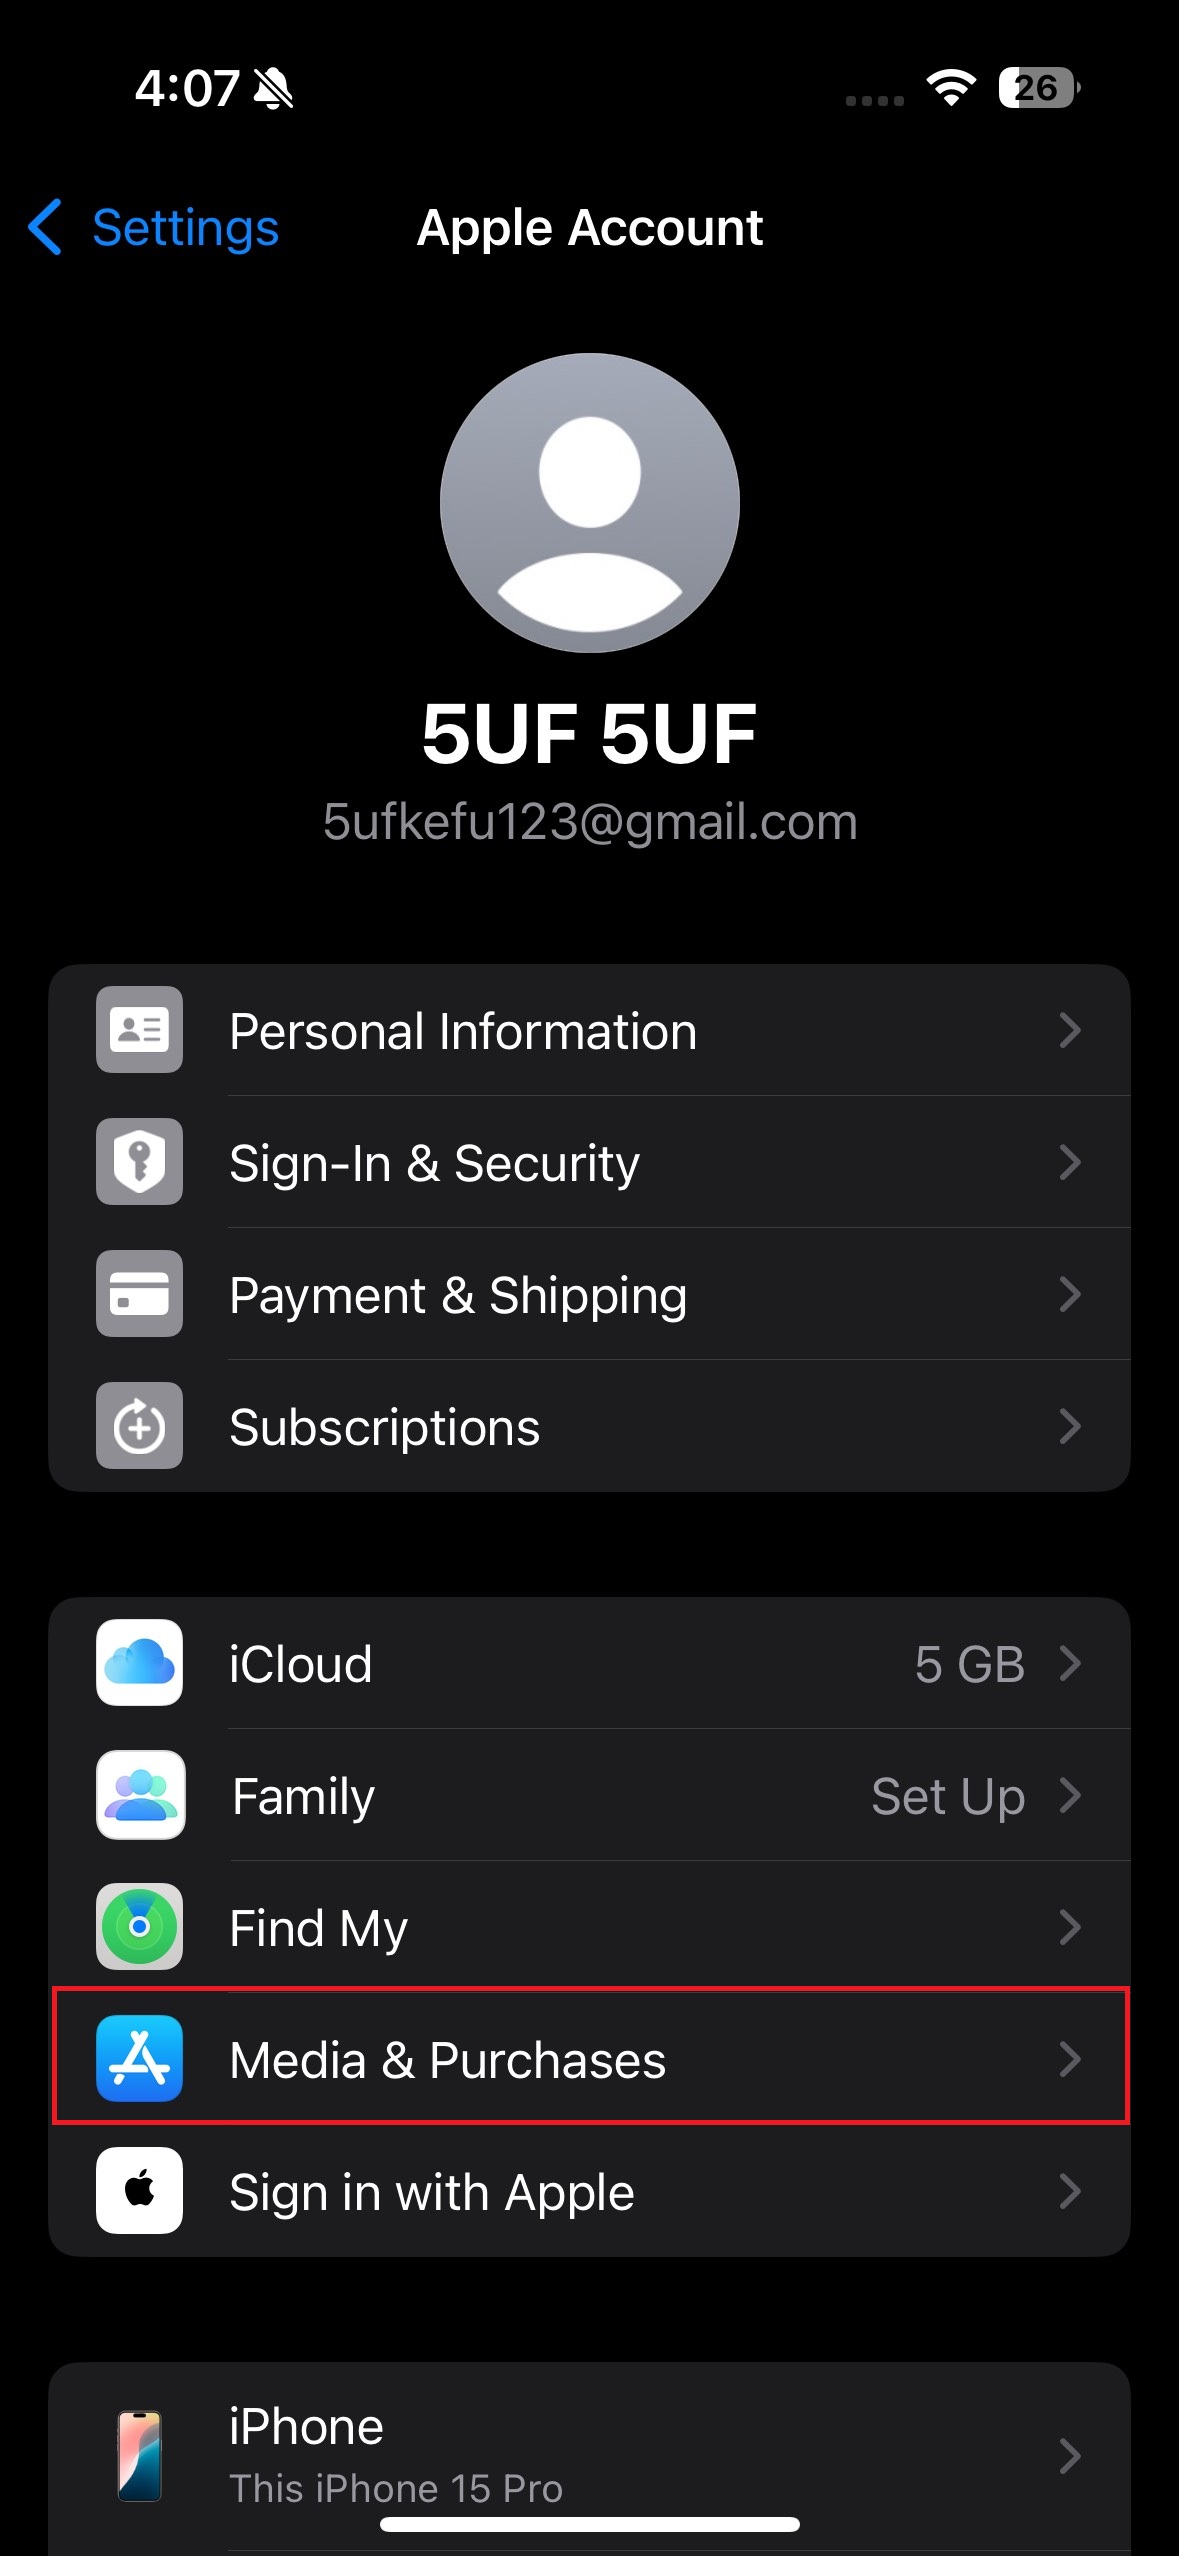
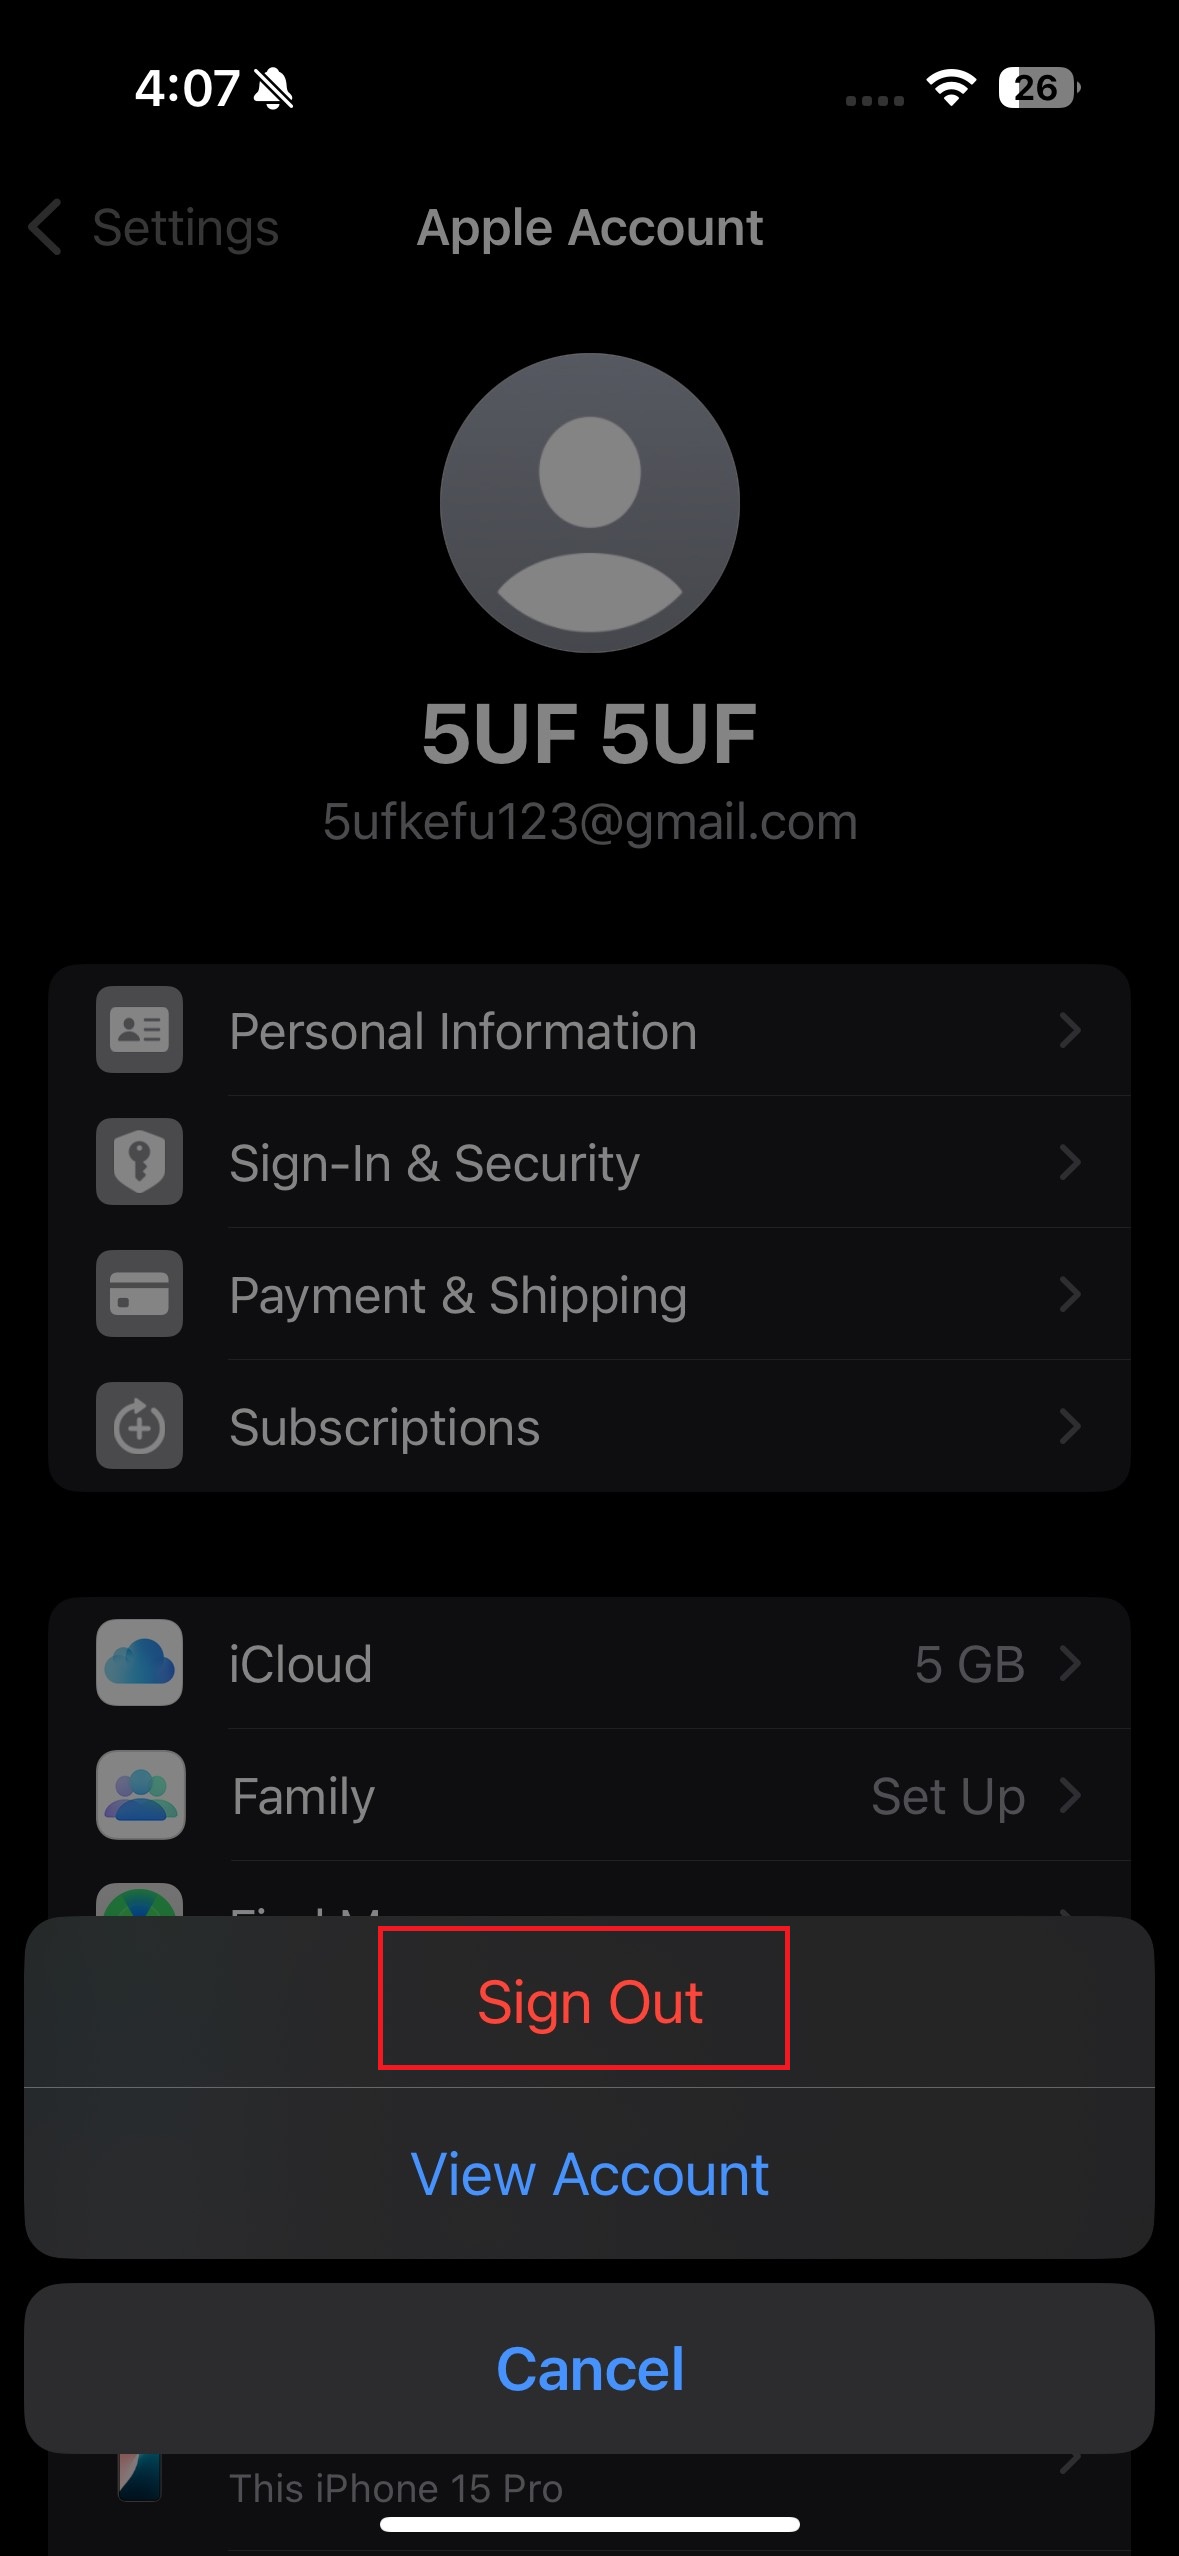
After signing out, return to the “Media & Purchases” section and sign in using the Apple ID you just created.
This will link your new account to the App Store and allow you to download apps from the selected region.


⚠️ A Few Notes:
-
Avoid switching Apple ID regions too often — it may affect app updates and subscriptions.
-
Don't use iCloud syncing with multiple Apple IDs on the same device.
-
If “None” isn’t showing, check that you’re on a Hong Kong (or similar) exit IP first (e.g. connect via a Hong Kong VPN). Prefer a desktop browser to create the account on account.apple.com, then sign in on your iPhone.
Frequently Asked Questions
No, logging out only affects store-related services. Your personal data and iCloud services remain safe as long as you're still signed in to iCloud.
Photos
Contacts
Messages (iMessage)
FaceTime
iCloud Drive
Find My iPhone
App Store & iTunes Store access
Apple Music, if subscribed under that Apple ID
Apple TV+, Apple Arcade, and other subscriptions tied to that ID
Note: When updating installed apps, iOS uses the Apple ID that originally downloaded (or acquired) each app, including free titles, which still count as a purchase record. This is separate from which Apple ID is currently signed in under Media & Purchases for new App Store activity, so updates are generally unaffected.
✅ Apple TV+ and full TV app content
✅ Restricted apps (YouTube, Telegram, WhatsApp, etc.)
✅ Apple Arcade, Apple News, full Apple Music catalog
✅ More payment options (PayPal, HK gift cards)
✅ App Store in English & Traditional Chinese
1. Will logging out of my Apple ID under Media & Purchases affect my device?
✅ Not Affected (if still signed into iCloud):
❌ Affected:
Switching from a Mainland China to Hong Kong Apple ID (Media & Purchases only) unlocks:
2. If my phone number has already been linked to another Apple account, can I still use the same phone number to create another account?
Answer: Yes, you can still use the same phone number to create or verify another Apple ID. However, the number can only be associated with iMessage and FaceTime for one Apple ID at a time. You may receive a prompt to verify which Apple ID you want the number to be used with for messaging and FaceTime.
When creating a new Apple ID, keep in mind that you must use an email address that has not been previously linked to any Apple ID. Each Apple ID requires a unique email, and the same email cannot be used to create multiple accounts.
3. What to do when you want to download apps that are only available in mainland China?
Answer: You can simply choose to sign out from the Media & Purchases account and log back into it using your mainland China Apple ID. Since both accounts are yours to manage, you can switch between them as needed to access region-specific apps.
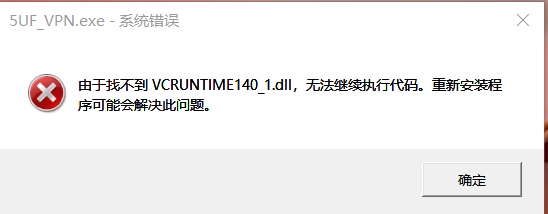
How to fix the missing VCRUNTIME140_1.dll error (for 5UF VPN)
If 5UF VPN reports VCRUNTIME140_1.dll is missing, install the official Microsoft Visual C++ Redistributable below. Do not download DLL files from unofficial sites.
❗️Encountering This Error? Follow These Steps to Fix It
If you see the error message below, don’t worry. Simply follow the steps provided to resolve the issue quickly and easily.
✅ Step 1: Go to the Official Microsoft Download Page
? Visit this official link:
? https://learn.microsoft.com/zh-cn/cpp/windows/latest-supported-vc-redist?view=msvc-170
This page contains the latest supported Visual C++ Redistributable installers.
✅ Step 2: Download the Correct File for Your Device
Scroll down to the section:
“Visual C++ Redistributable v14"
Then download the version(s) based on your system:
| Your Device Type | File to Download | Description |
|---|---|---|
| ?️ 64-bit Windows | vc_redist.x64.exe | For most modern systems; includes x64 and ARM64 binaries |
| ? 32-bit Windows | vc_redist.x86.exe | Needed for older systems or some 32-bit apps |
✅ Tip: If you're not sure, install both files to ensure full compatibility.
✅ Step 3: Install the Redistributables
-
Run each.exefile you downloaded
-
Follow the installation prompts
-
Restart your computer once finished
✅ Step 4: Launch 5UF VPN Again
After restarting:
-
Double-click to launch the 5UF VPN client
-
The app should now start normally without any DLL errors
❌ Important Warning
Do not download DLL files from third-party websites — they may contain malware or be outdated.
Always use the official Microsoft source linked above.
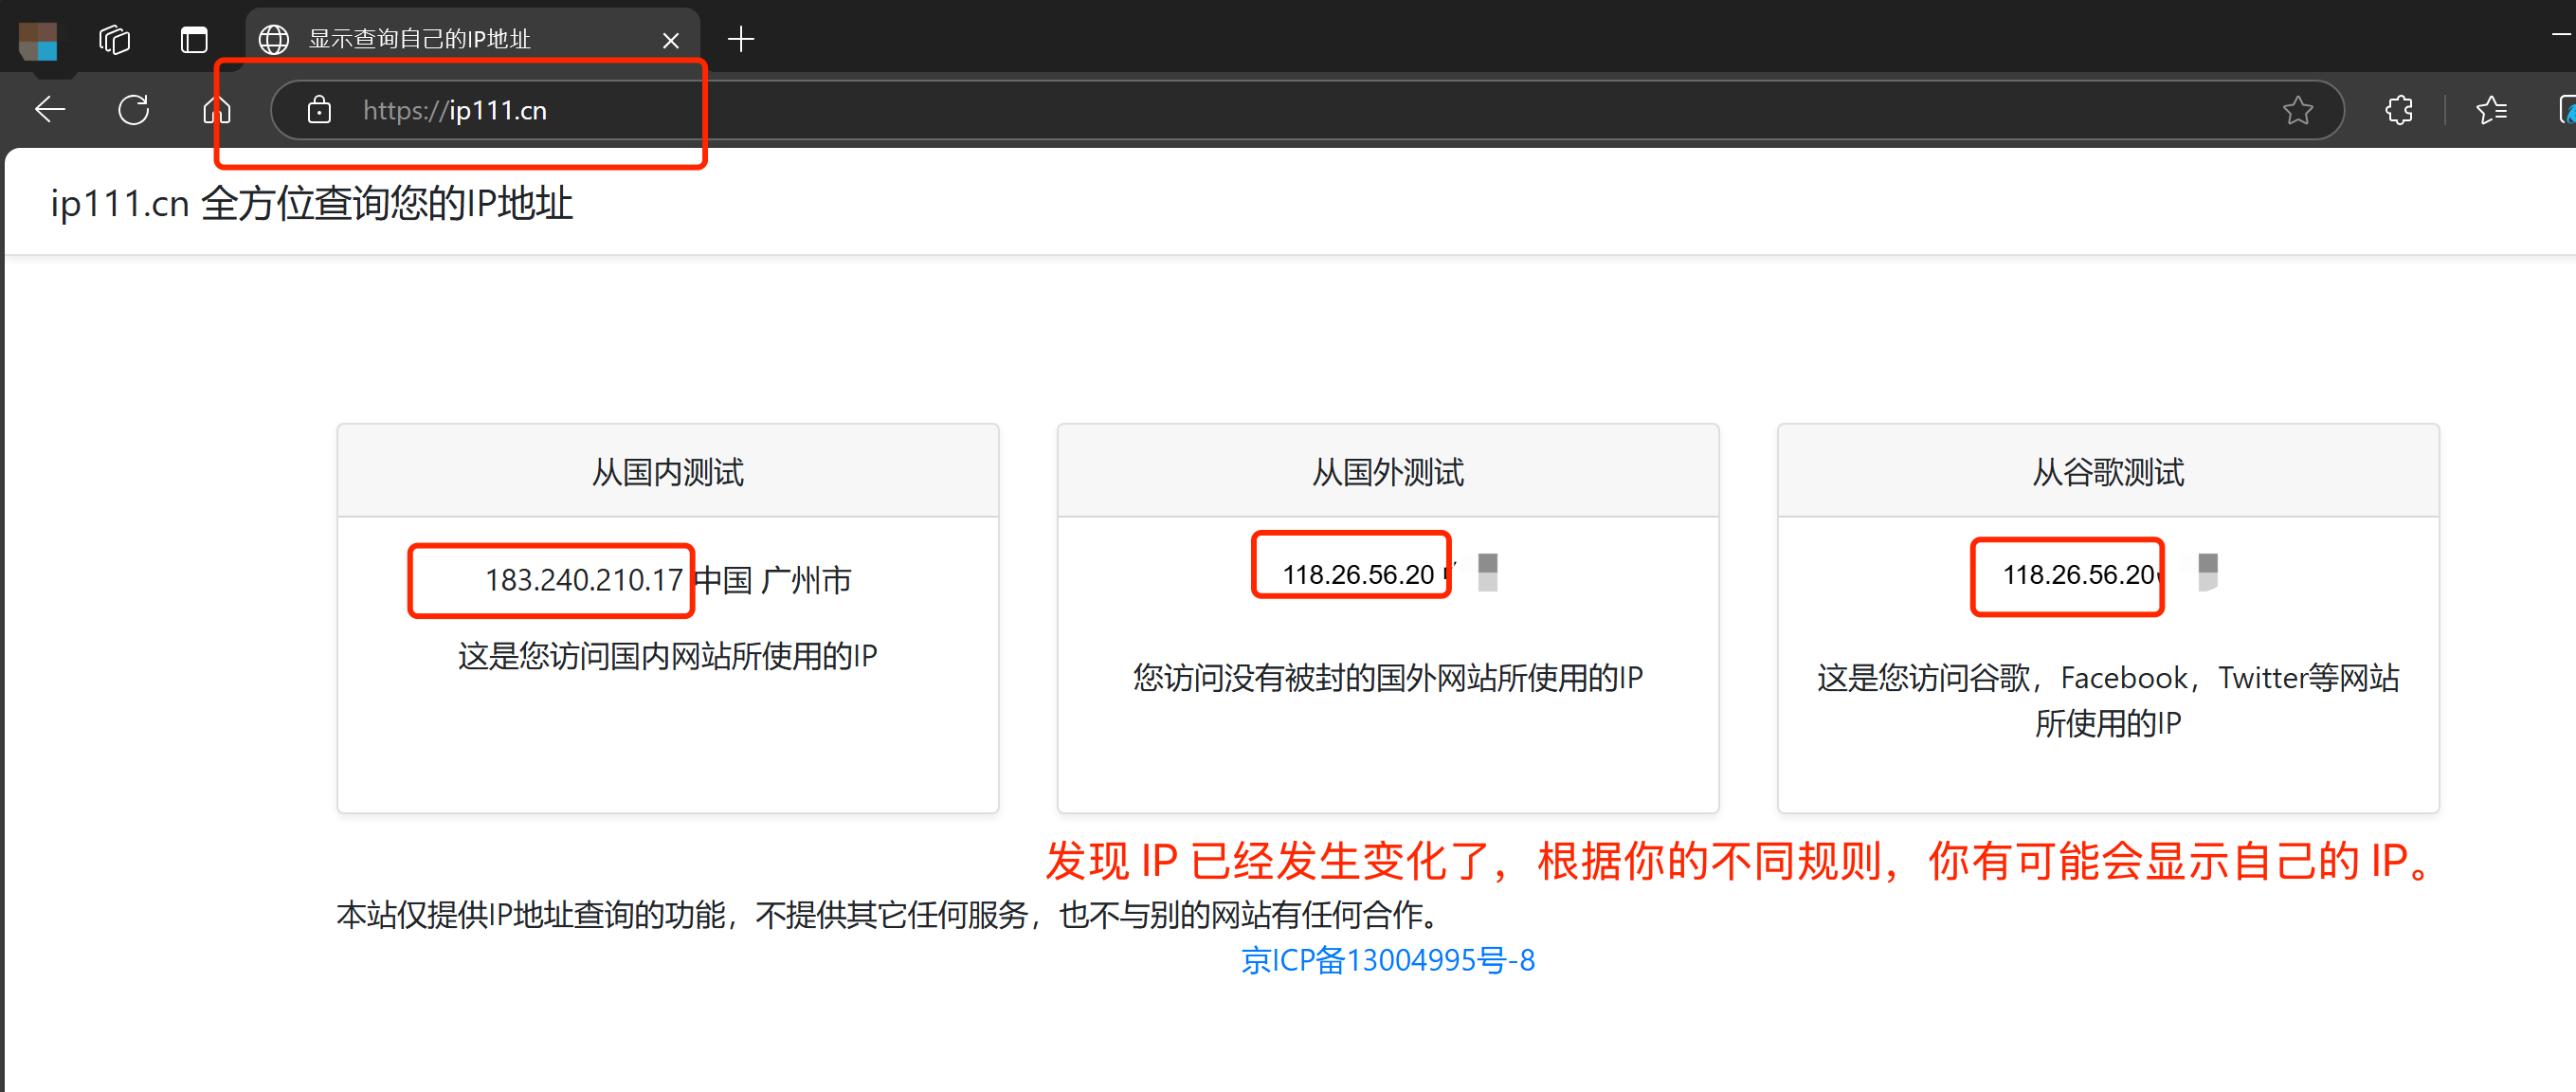
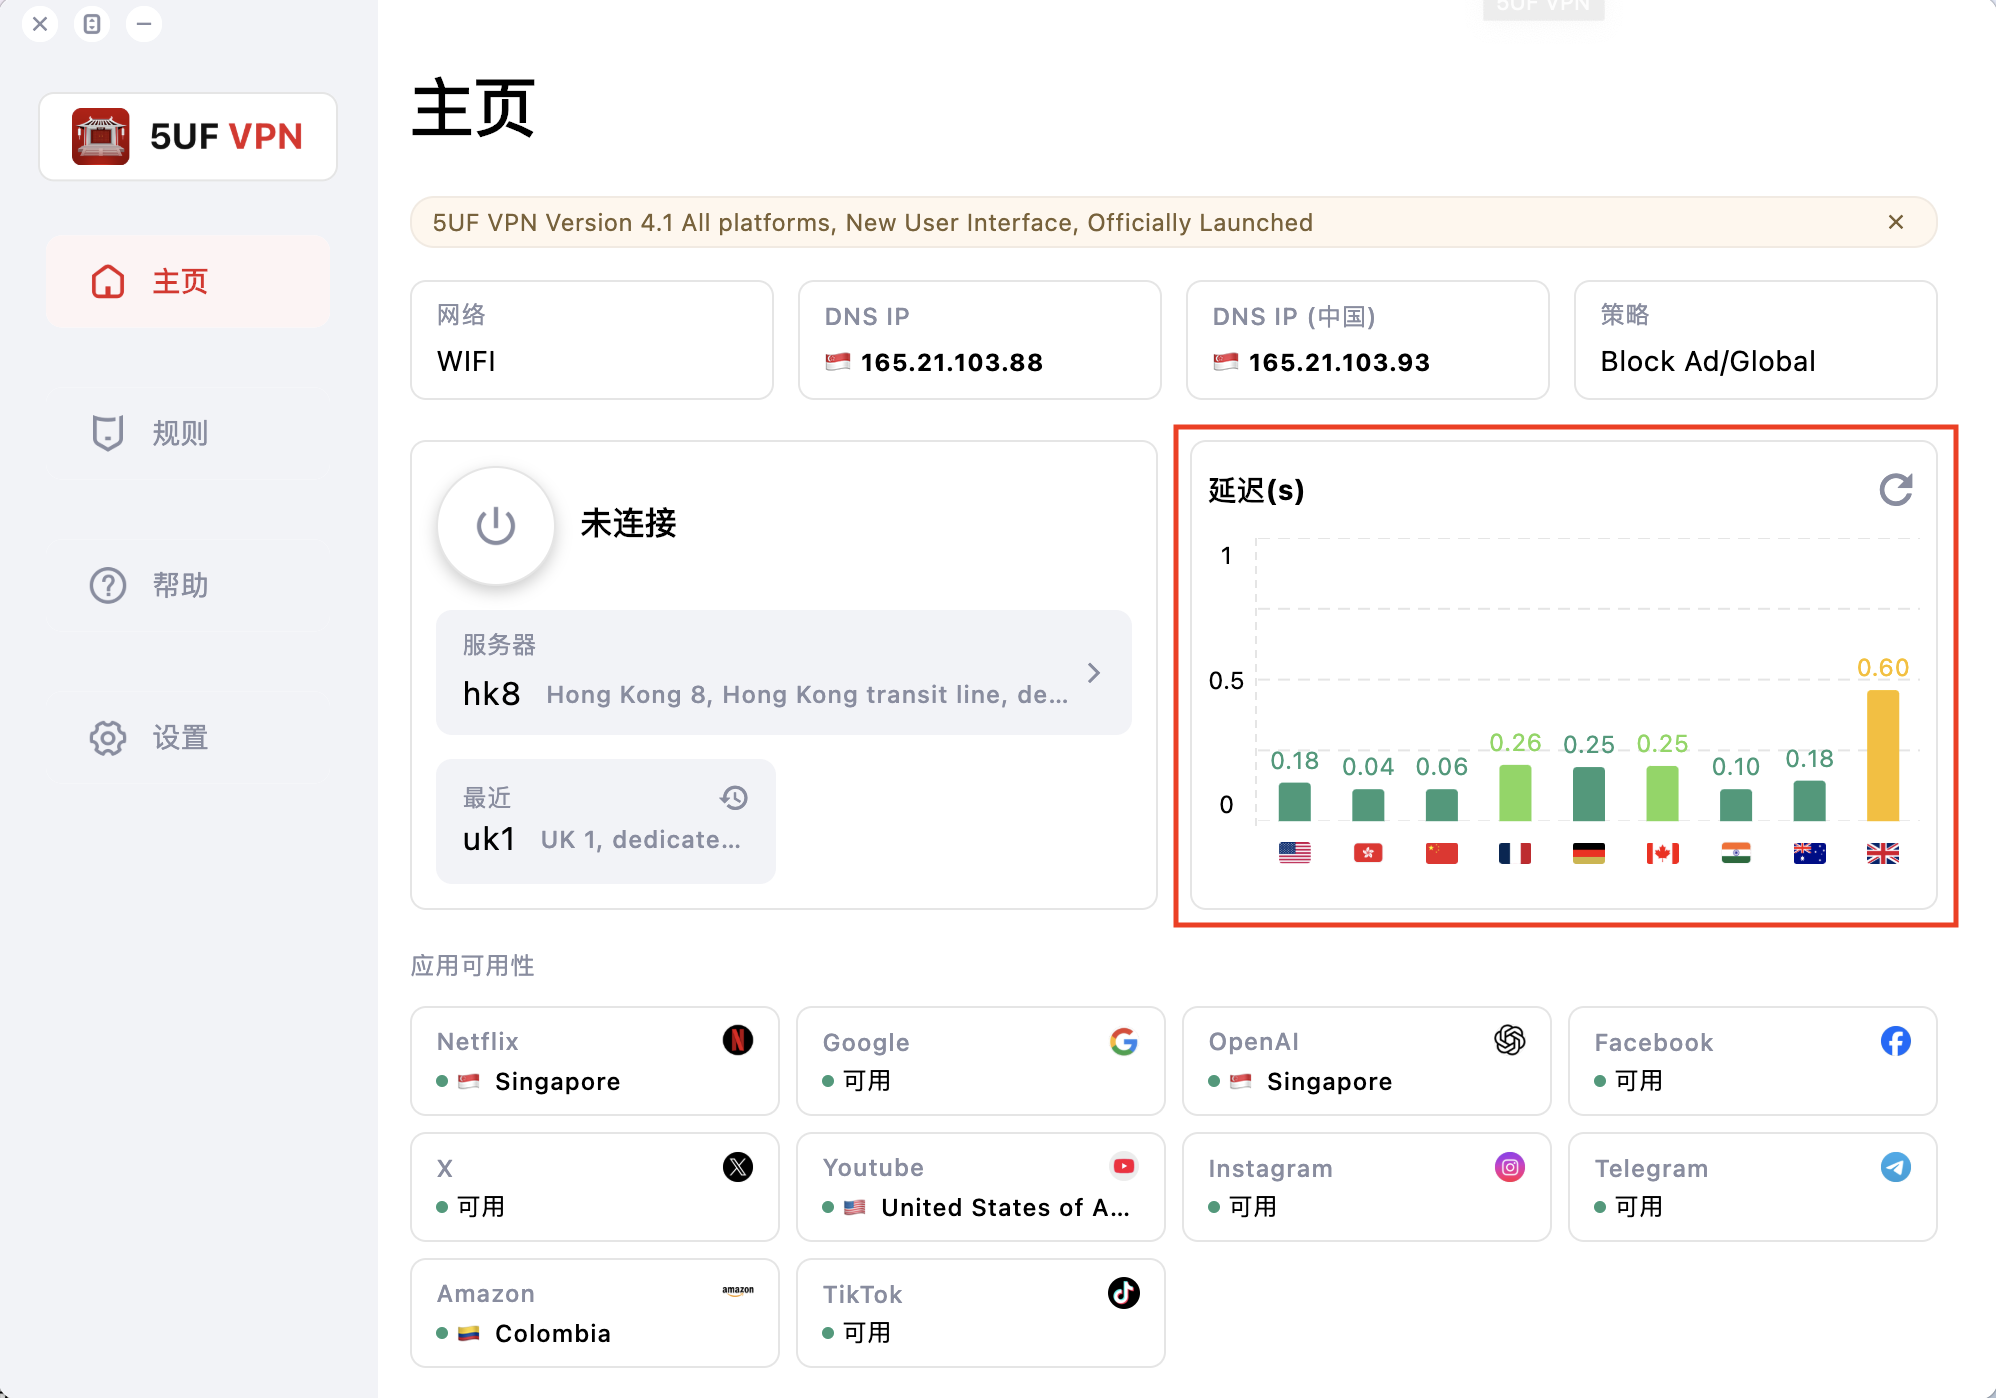
Discover one of our latest client features — instantly test your internet speed and seamlessly explore IP addresses from around the world.
Check Your Wi-Fi Speed with Ease
With our app, you can instantly monitor your personal Wi-Fi speed. On the right side of the screen, you’ll see real-time performance indicators showing how your connection performs across various locations worldwide.
-
Before VPN Connection:
If the indicators appear mostly in red or yellow, this means your base internet connection is slow. In such cases, connecting to the VPN will not increase your speed—it will reflect the limitations of your current network.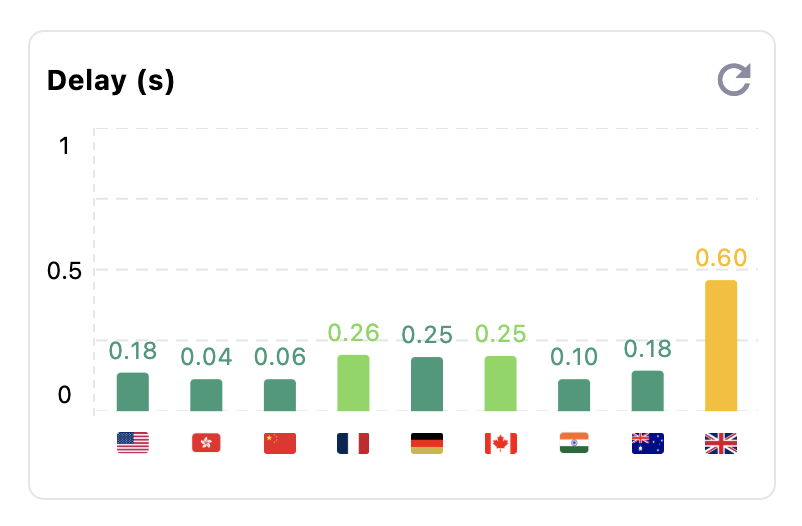
-
After VPN Connection:
Click on the bar graph to view your IP address and track how it changes as you connect to different VPN locations. This allows you to quickly identify whether any issues are related to your ISP or the VPN connection itself.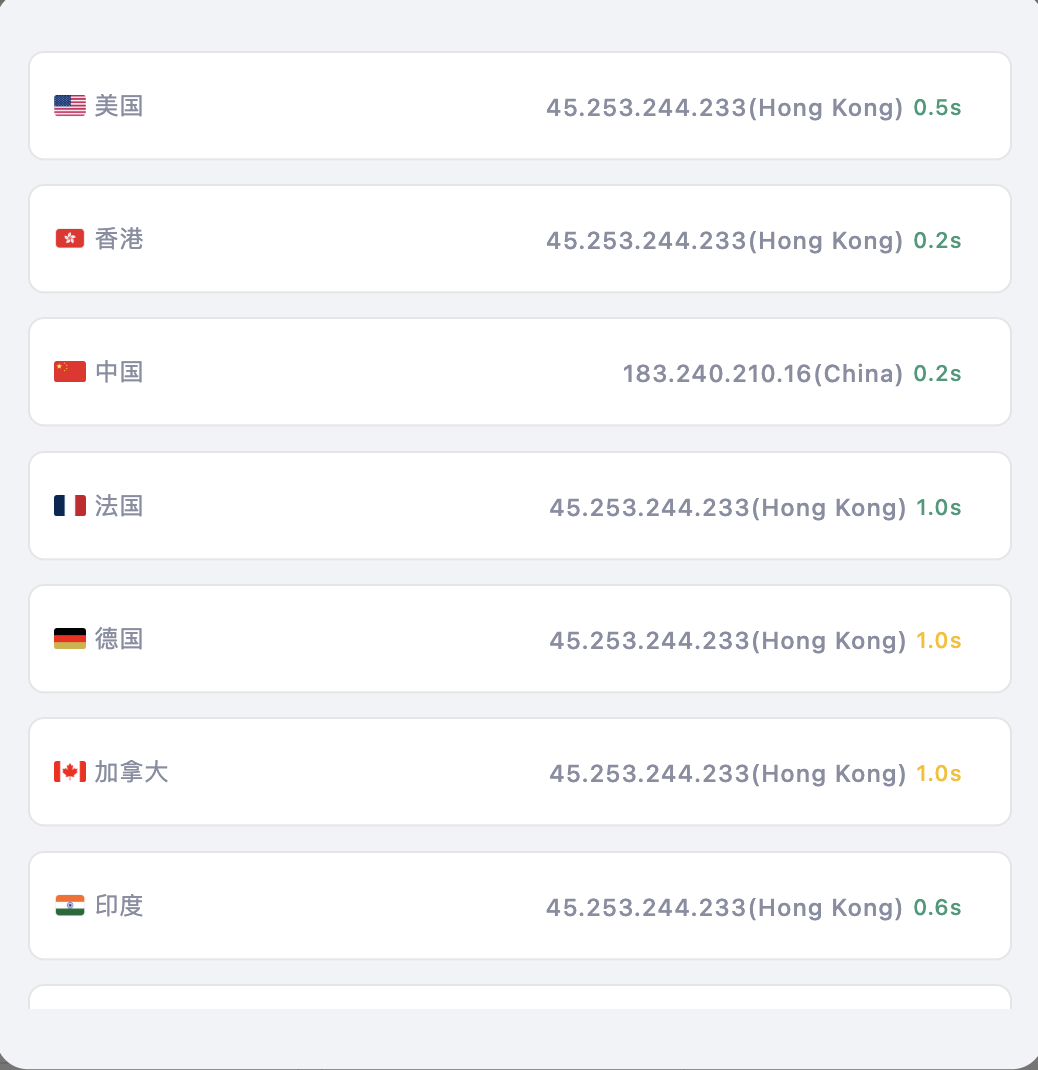
-
Refresh Any Location:
Simply tap on a location to refresh its status and get updated performance data.
How to add 5UF to Control Center (iOS – Edit)
Adding 5UF to Control Center (iOS – Edit)
The following procedure outlines how to add the 5UF application to your Control Center, enabling immediate VPN activation directly from the system interface.
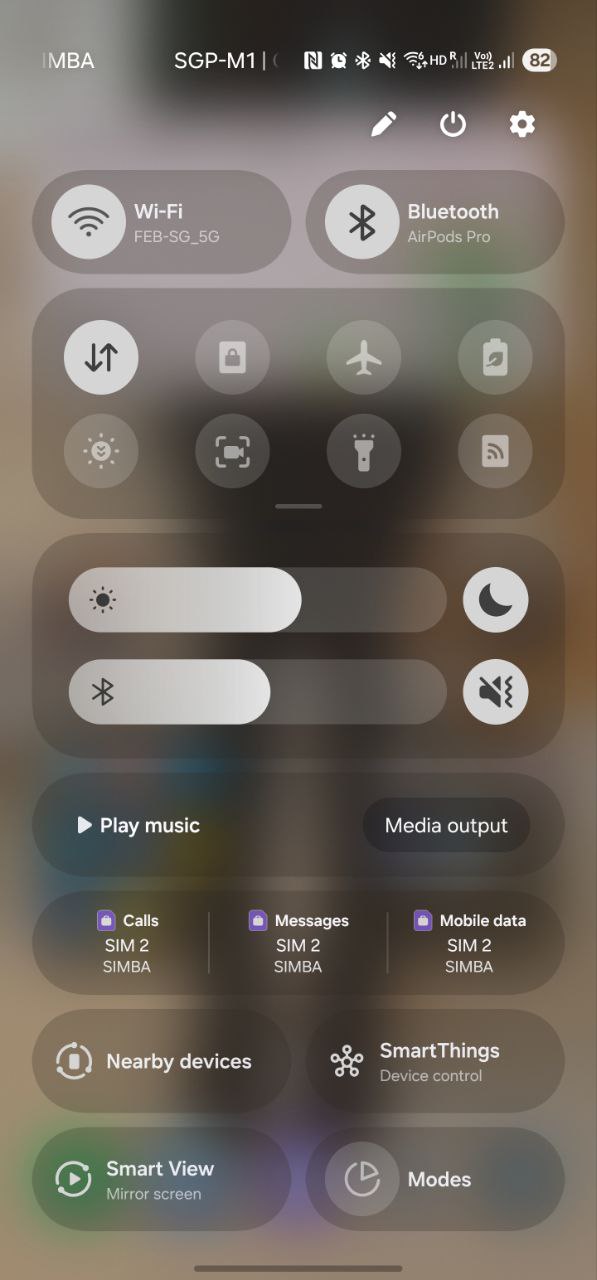
Step 1 — Access the Control Panel
Swipe downward from the top-right corner of the display to reveal the Control Center.
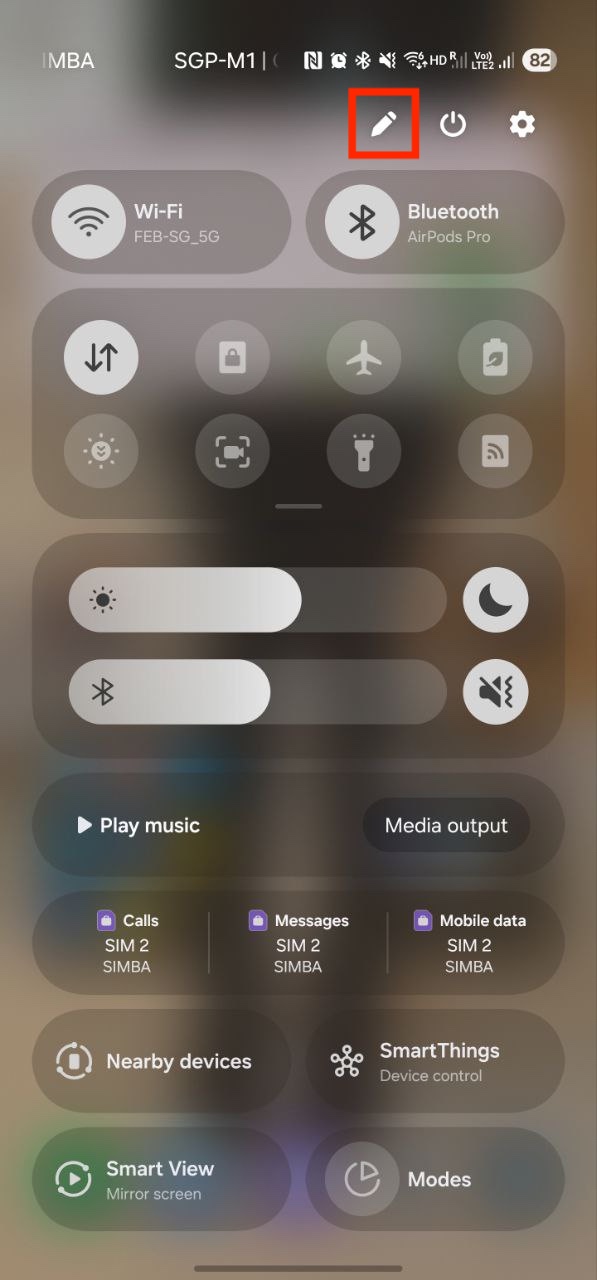
Step 2 — Enter Edit Mode
Click the edit button on the top right corner of the screen to enter edit mode.
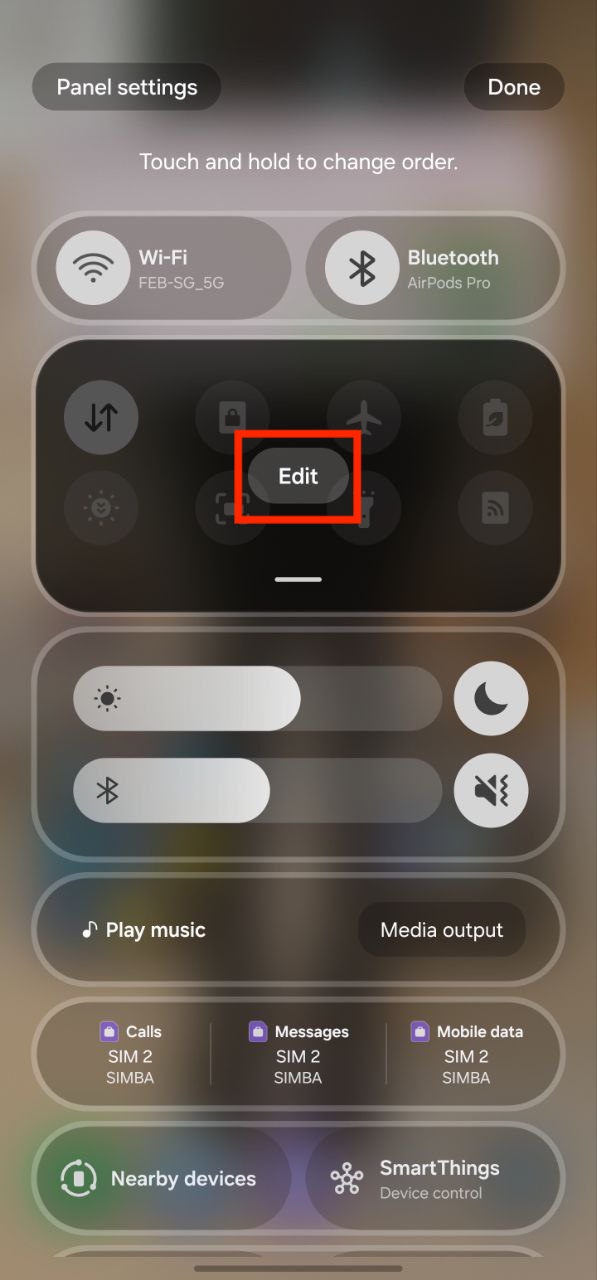
Step 3 — Add the 5UF Control
Select the 5UF application from the available buttons at the bottom of the screen to add it to the control panel.
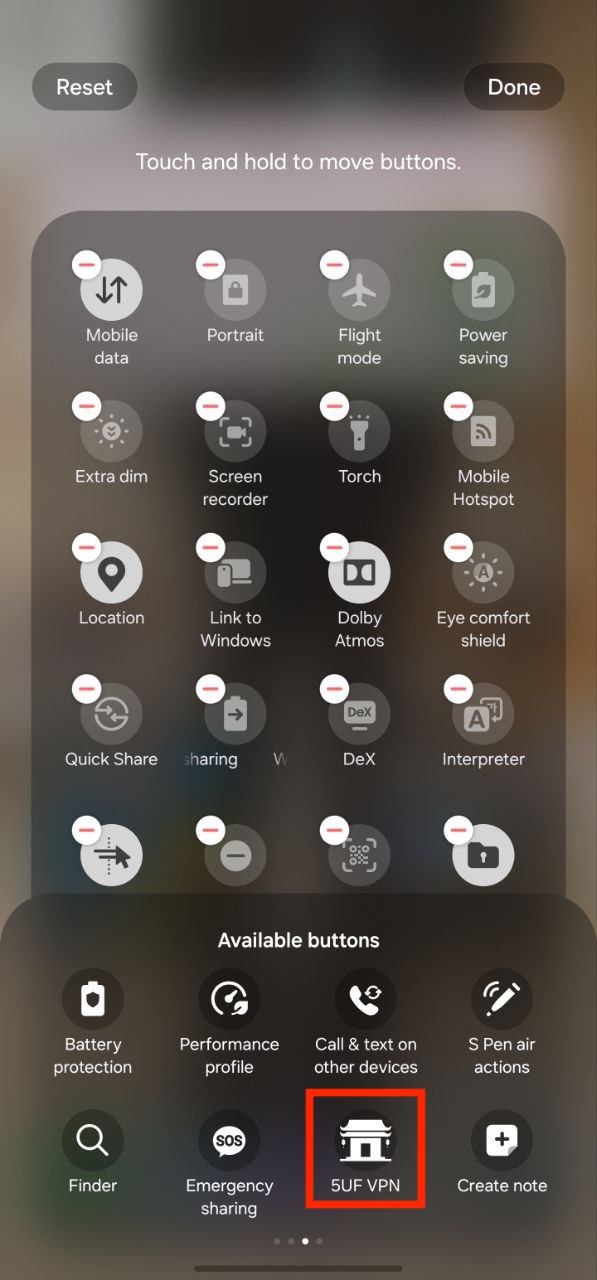
Completion
Once the control has been added, the 5UF VPN can be activated instantly by tapping the 5UF icon within the control panel.
How to add 5UF to Control Center (iOS – Add Control)
Adding 5UF to Control Center (iOS – Add Control)
The following procedure outlines how to add the 5UF application to your Control Center, enabling immediate VPN activation directly from the system interface.
Step 1 — Access the Control Panel
Swipe downward from the top-right corner of the display to reveal the Control Center.
Step 2 — Enter Edit Mode
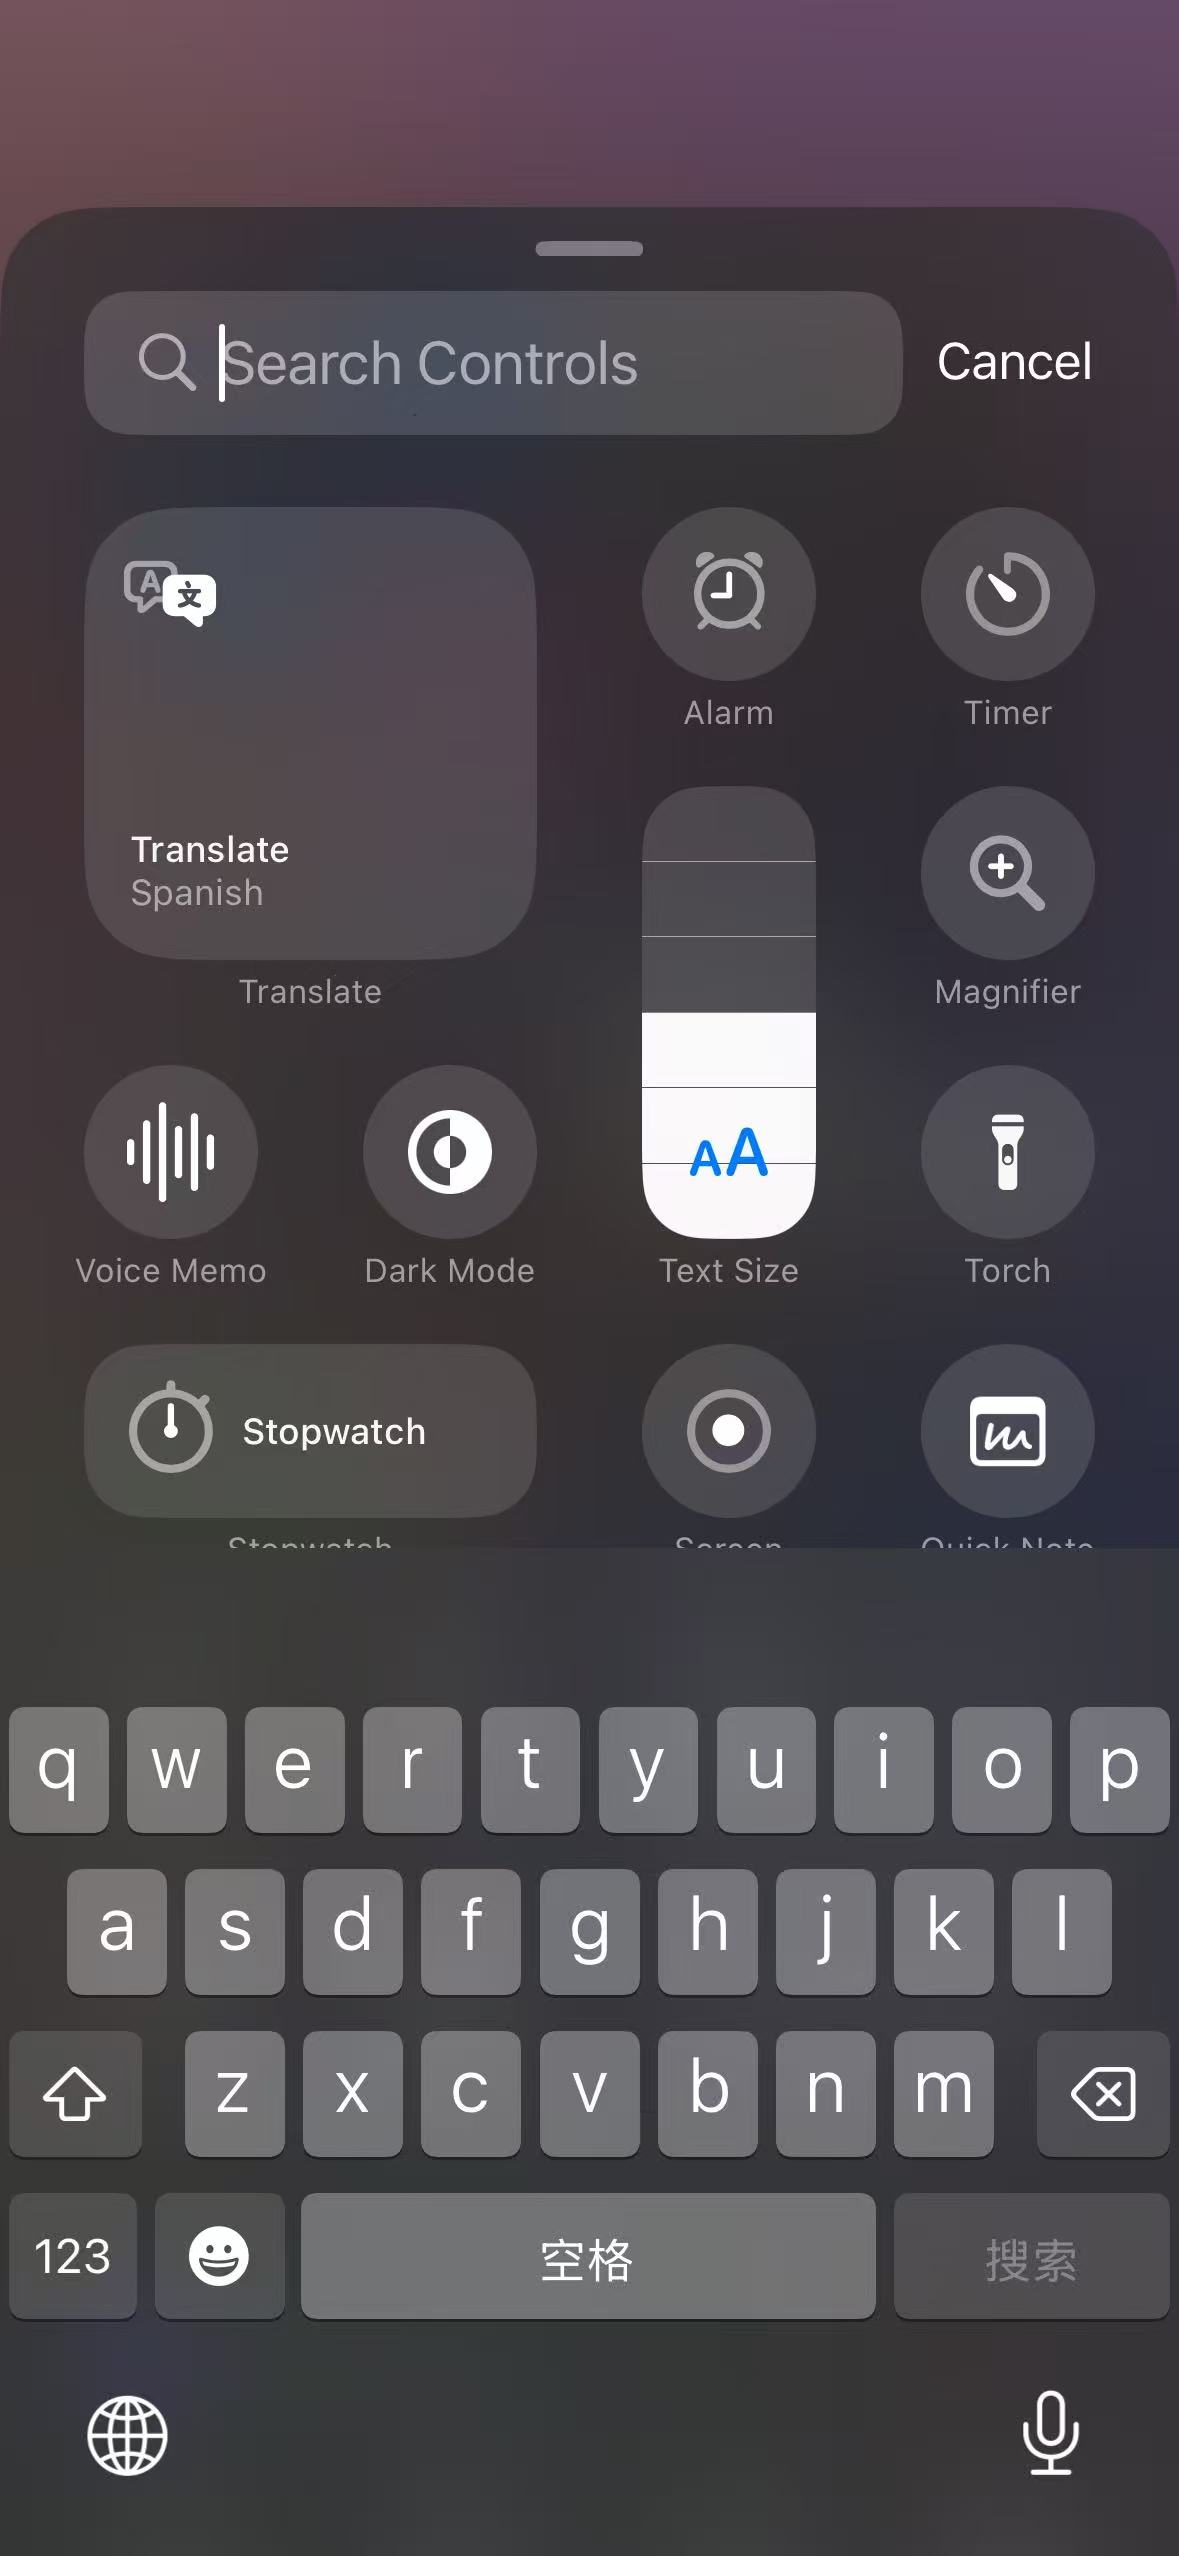
Press and hold any unoccupied area within the control panel, then select “Add a Control” from the options displayed at the bottom of the screen.

Step 3 — Add the 5UF Control
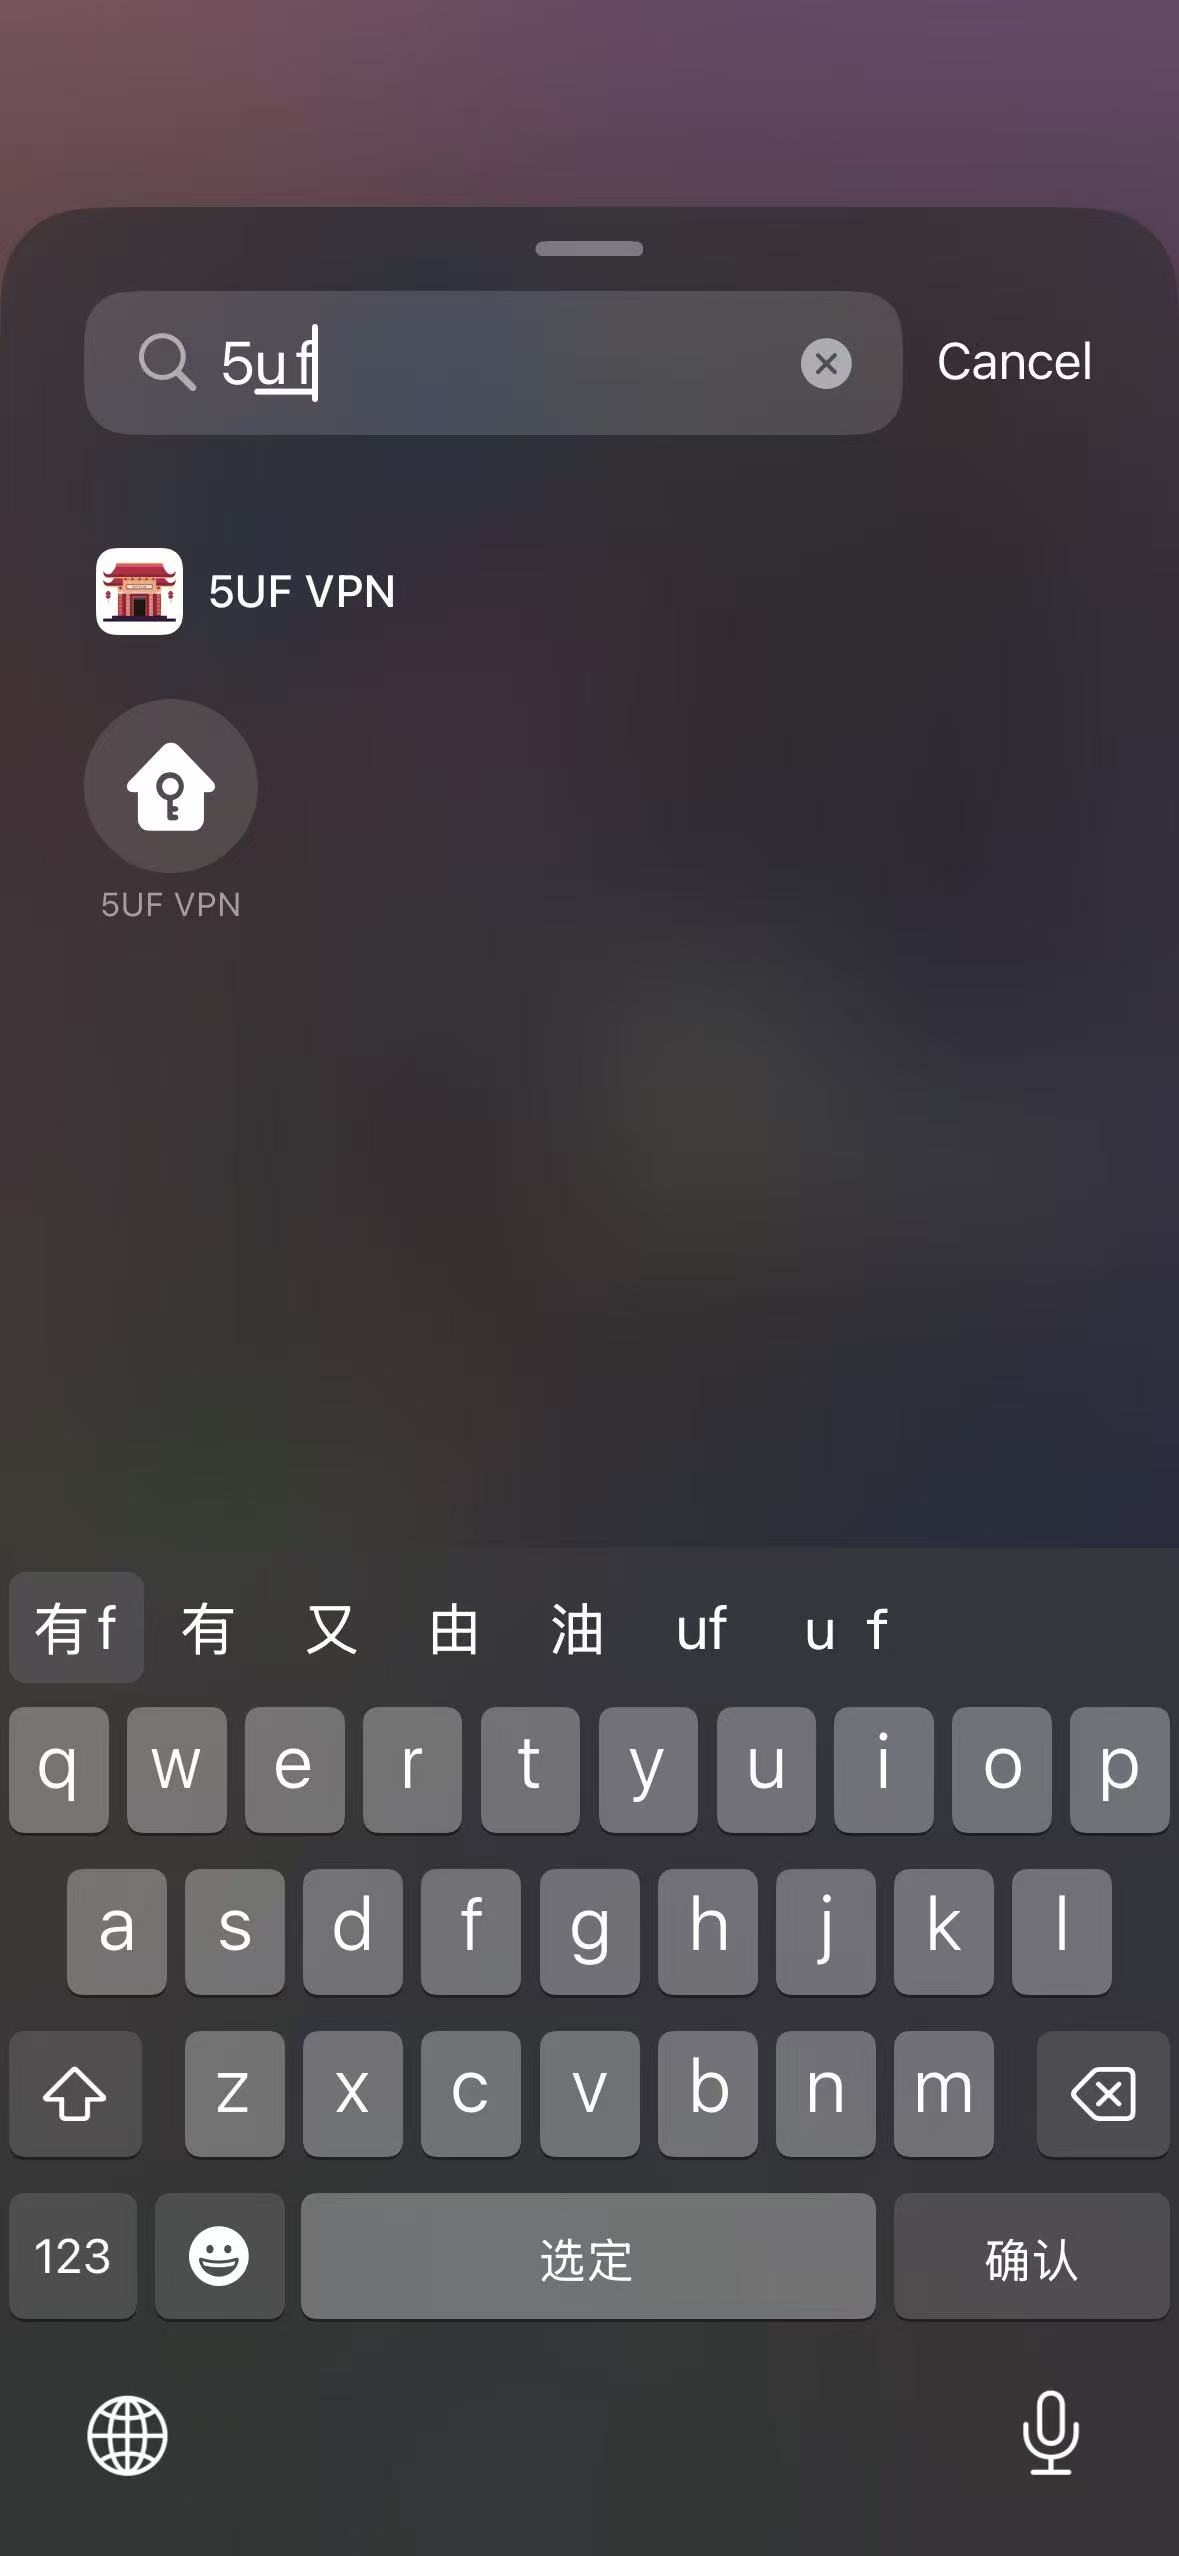
In the search field located at the top of the interface, type “5UF”.
Select the 5UF application from the search results to add it to the control panel.
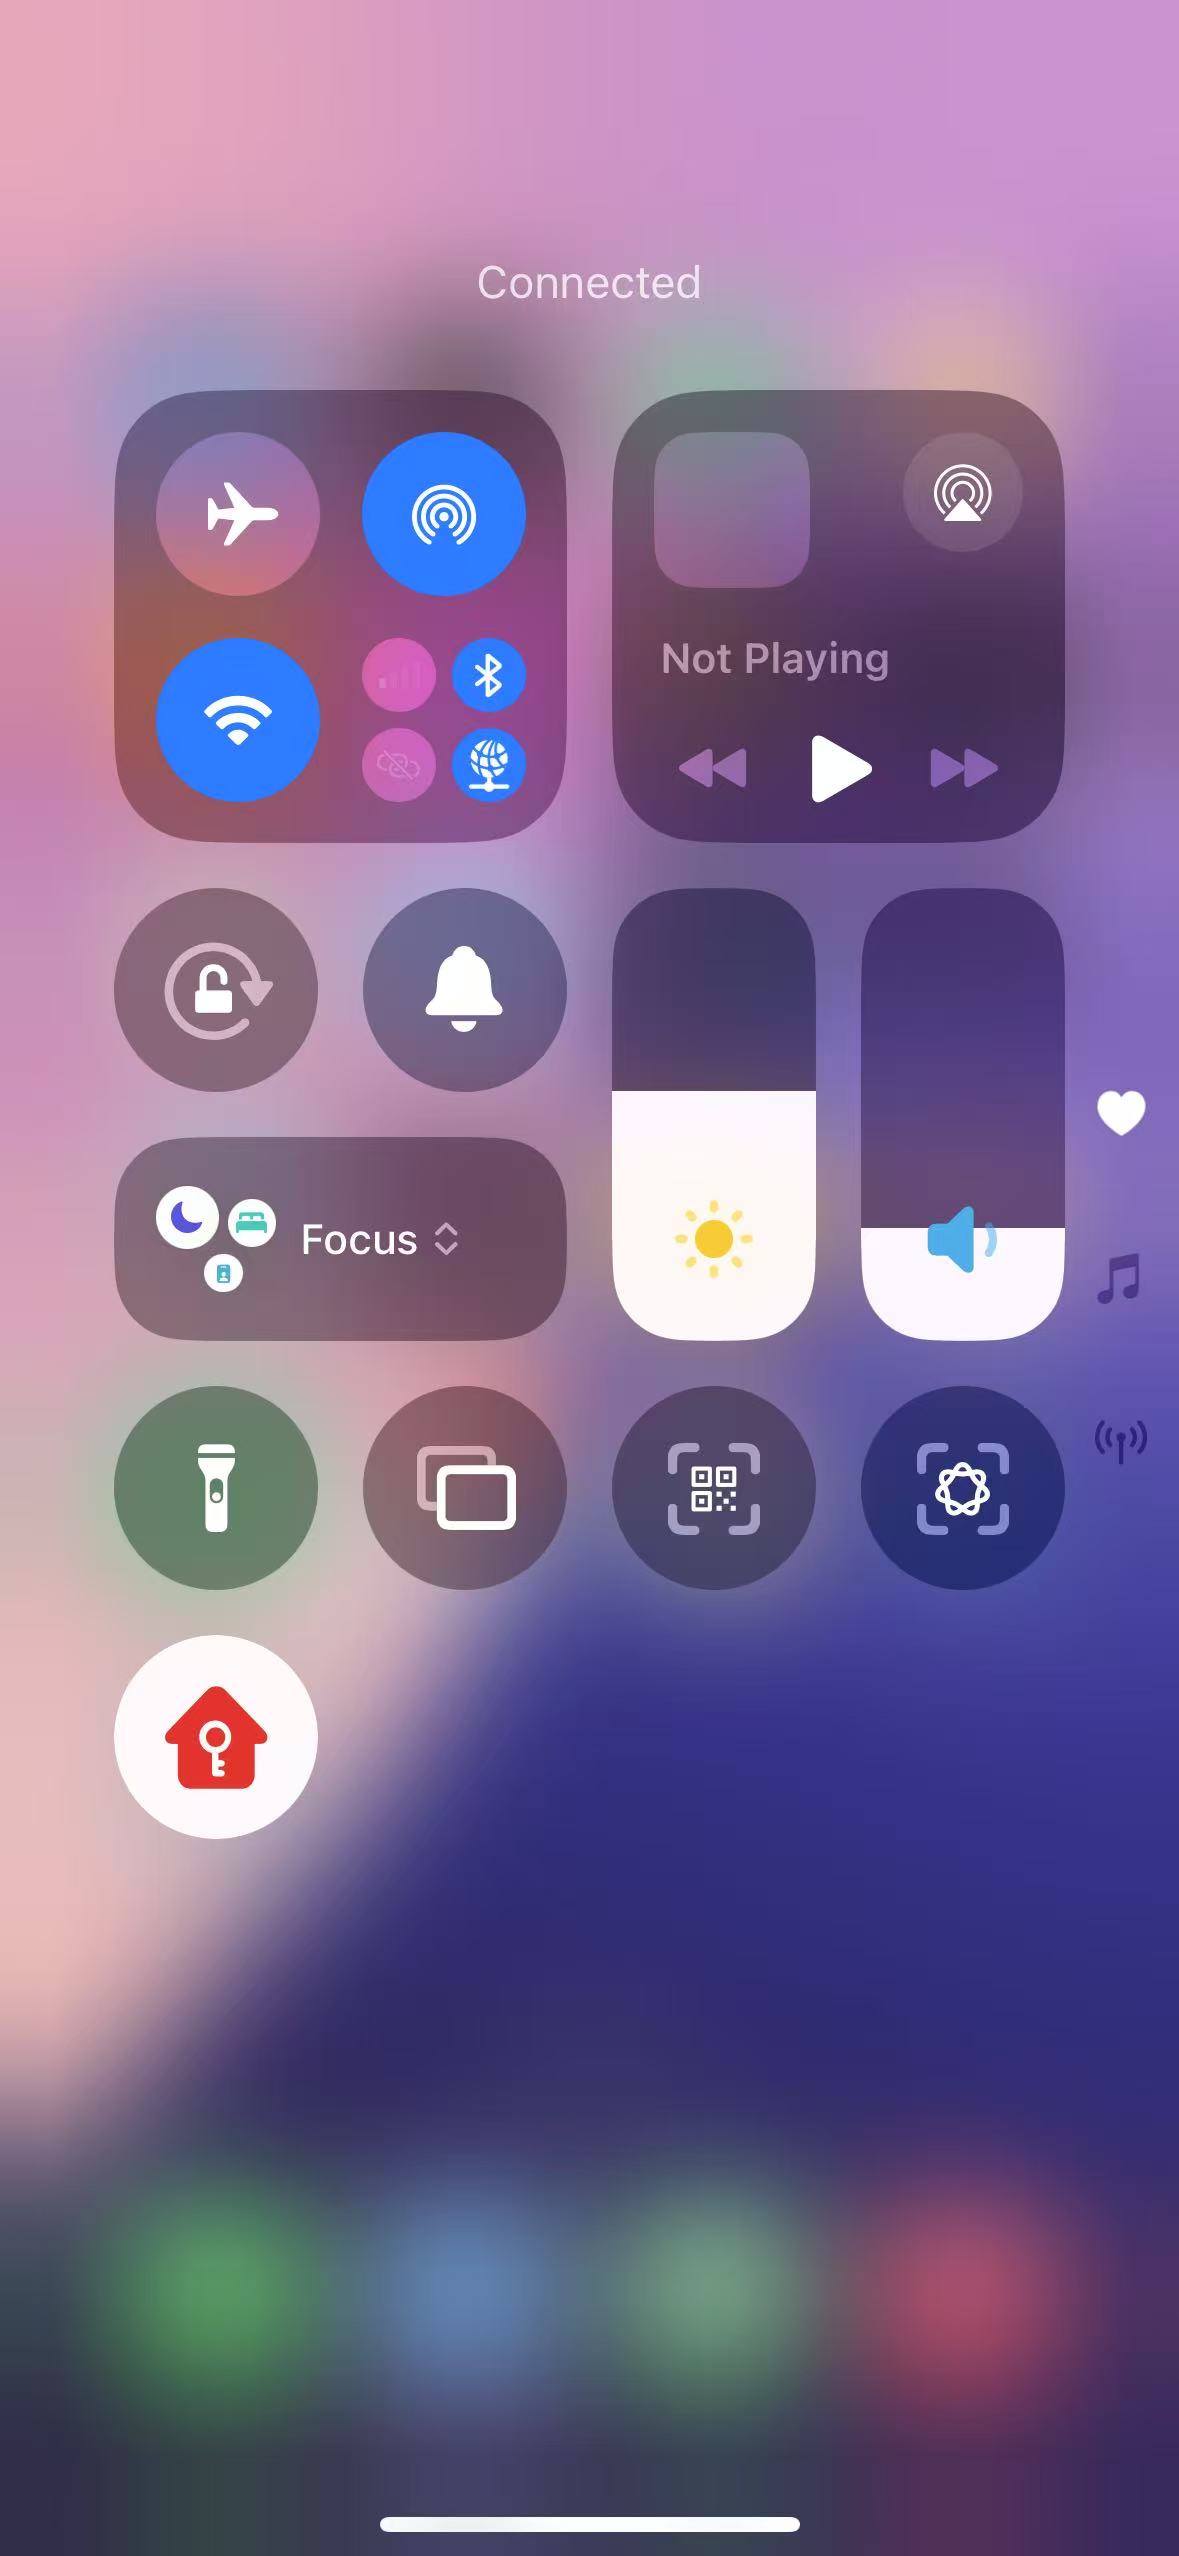
Completion
Once the control has been added, the 5UF VPN can be activated instantly by tapping the 5UF icon within the control panel.
What is the difference between Global mode and Partial mode?
In 5UF VPN, Global mode and Partial mode describe how much of your traffic goes through the VPN.
Global mode:
- Most system traffic goes through the VPN.
- Good for users who want a more consistent VPN route.
- Also more suitable for apps that do not support proxy mode well.
Partial mode:
- Only selected websites, apps, or rule-based traffic goes through the VPN.
- Other traffic continues to use the local network directly.
- Useful when you only want specific traffic to use the VPN.
How should you choose?
- If you are not sure, Global mode is usually the simpler starting point.
- If you only want a small part of traffic to use the VPN, choose Partial mode.
The naming may vary slightly on different platforms, but the core idea is the same.
How to start VPN automatically after login
If you want VPN to open automatically after you sign in to your computer, use the system's built-in startup settings.
Recommendation: use the latest 5UF VPN app together with the operating system's auto-start feature. This is more stable than older client-based solutions.
Windows:
- Add the 5UF app to your startup items.
- For more reliable startup behavior, run it with administrator permission if needed.
macOS:
- Add the 5UF app to Login Items in System Settings.
- This allows the app to start automatically after you sign in.
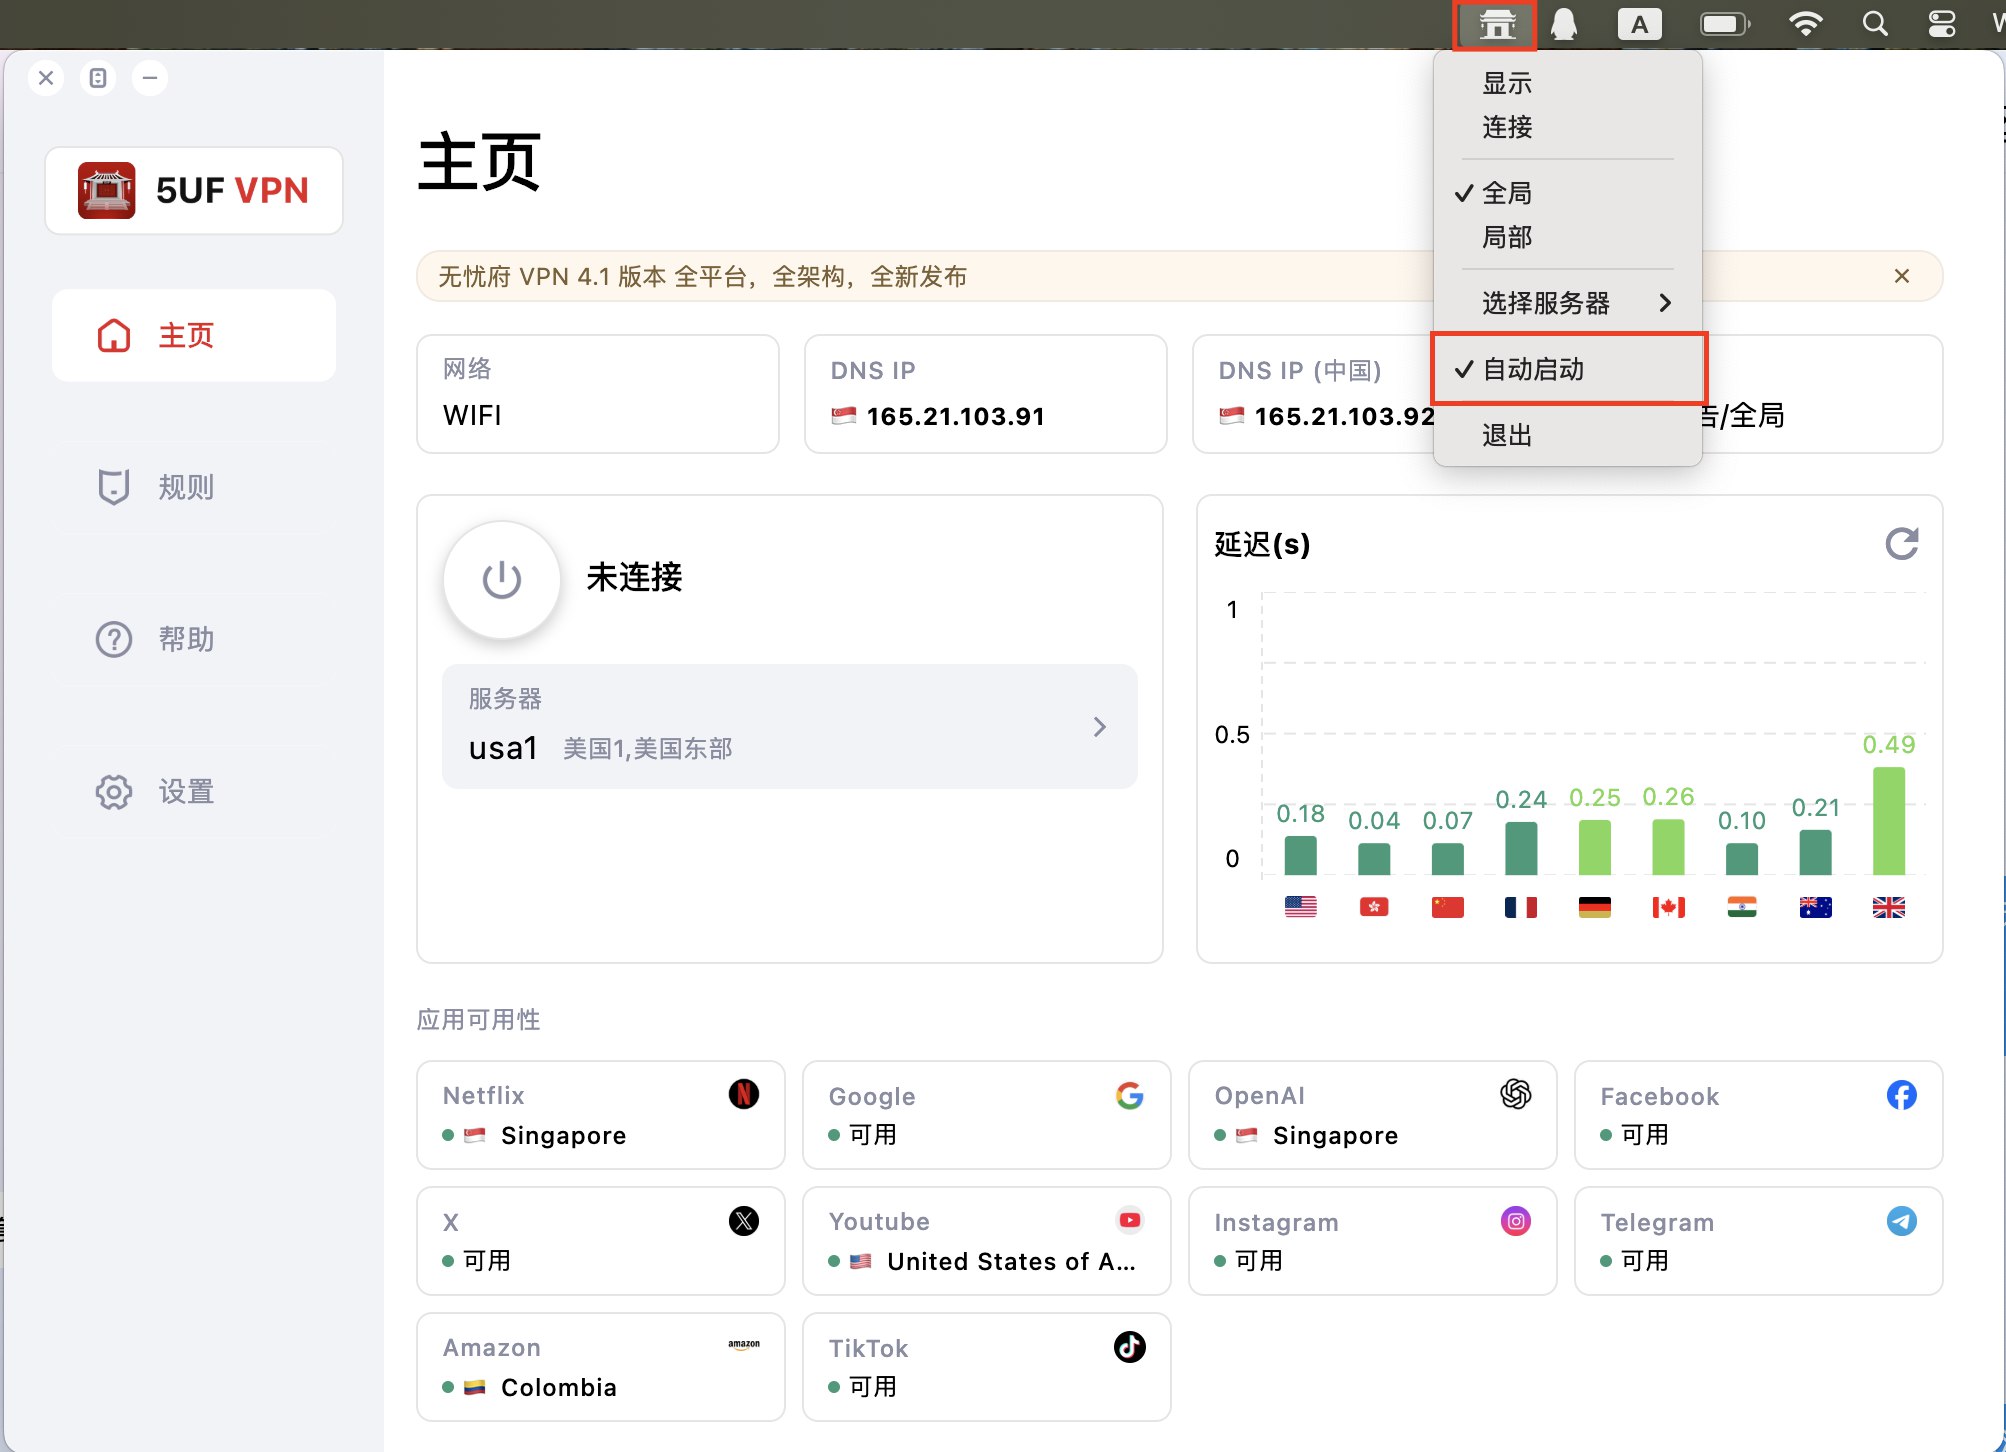
If you also want it to connect automatically after launch, make sure the related in-app option is enabled.
How to open 5UF VPN automatically at login (Windows)
Windows Setup Instructions for 5UF VPN Auto-Launch
Follow the steps below to configure 5UF VPN to start automatically when you log into your Windows account:
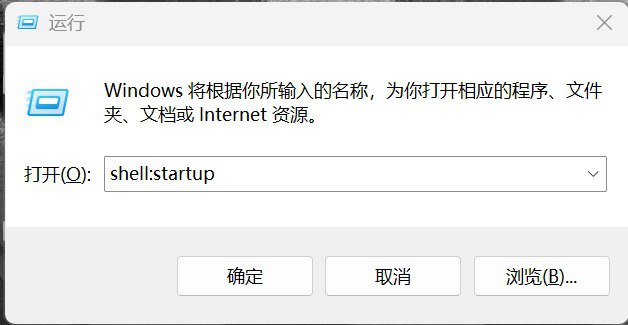
Step 1: Open the Run Dialog
Press the Windows + R keys simultaneously to open the Run dialog box.
Step 2: Access the Startup Folder
Type the following command into the Run box and press Enter:
shell:startup
This will open the Startup folder where programs that launch at login are stored.
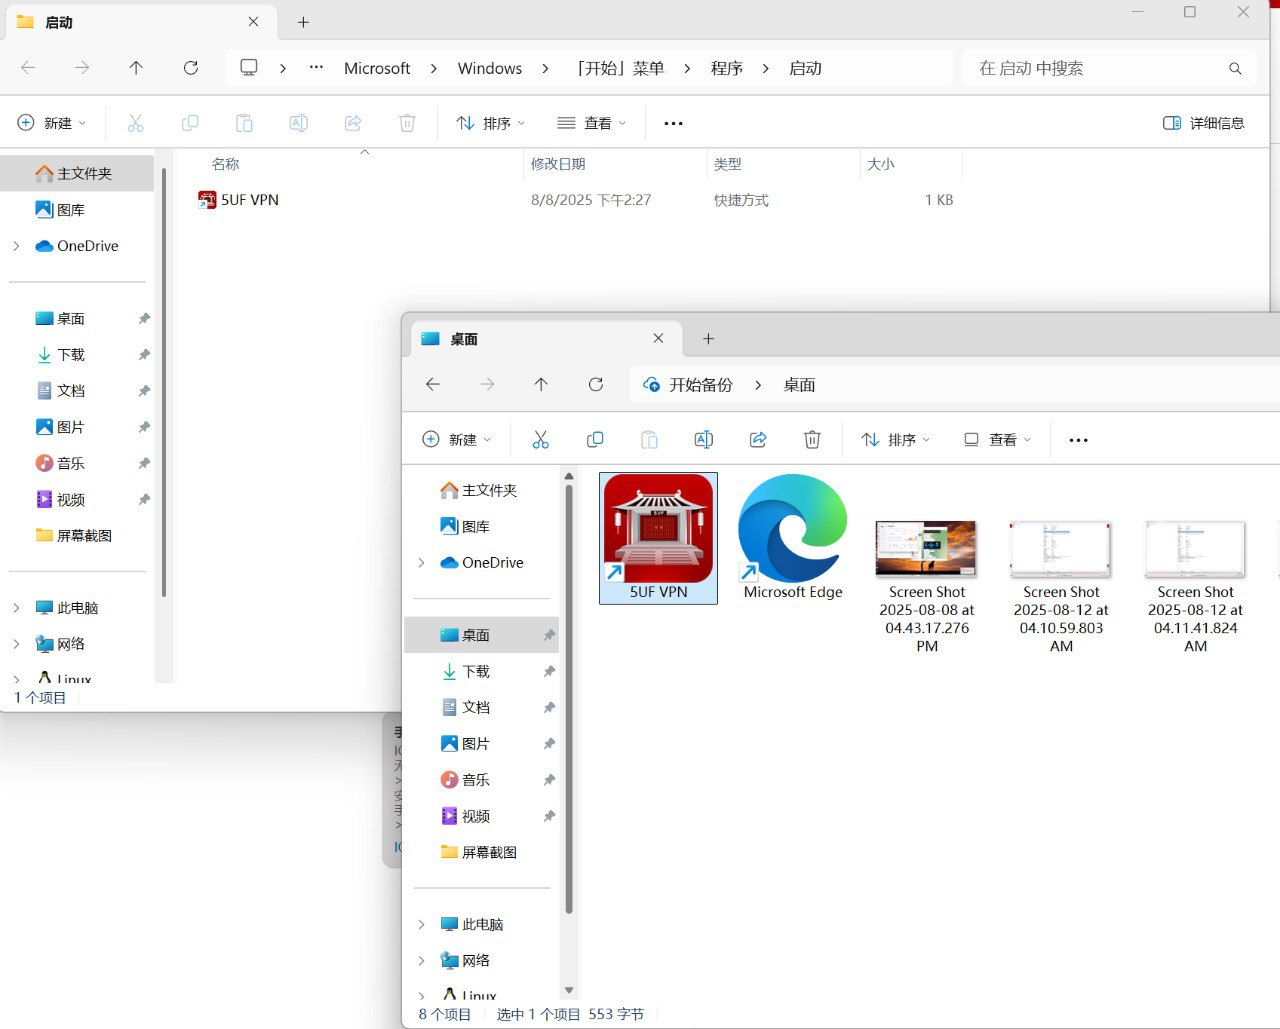
Step 3: Add 5UF VPN to Startup
Locate the 5UF VPN application executable or its shortcut on your computer.
Drag and drop the 5UF VPN shortcut into the Startup folder window. This action ensures the app will automatically launch every time you sign in.
Additional Tips:
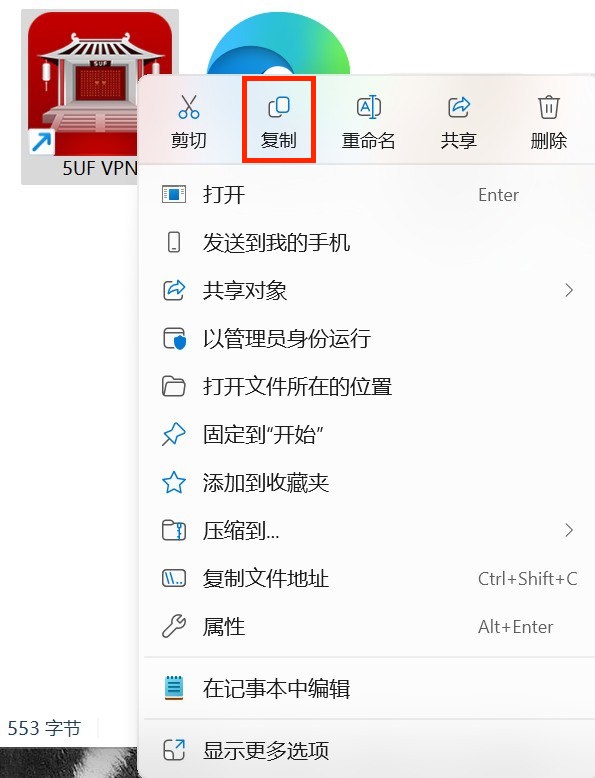
-
If you do not have a shortcut, right-click the 5UF VPN.exe file and select Create shortcut before moving it to the Startup folder.
-
To remove the app from startup, simply delete the shortcut from this folder.
How to open 5UF VPN automatically at login (macOS)
Mac Setup Instructions
Method 1: Using the Dock
-
Launch 5UF VPN.
-
In the Dock, right-click (or Control-click) the 5UF VPN icon.
-
Hover over Options and select Open at Login.
Launch 5UF VPN.
In the Dock, right-click (or Control-click) the 5UF VPN icon.
Hover over Options and select Open at Login.
Method 2: Using System Settings
-
Open System Settings → General → Login Items & Extensions.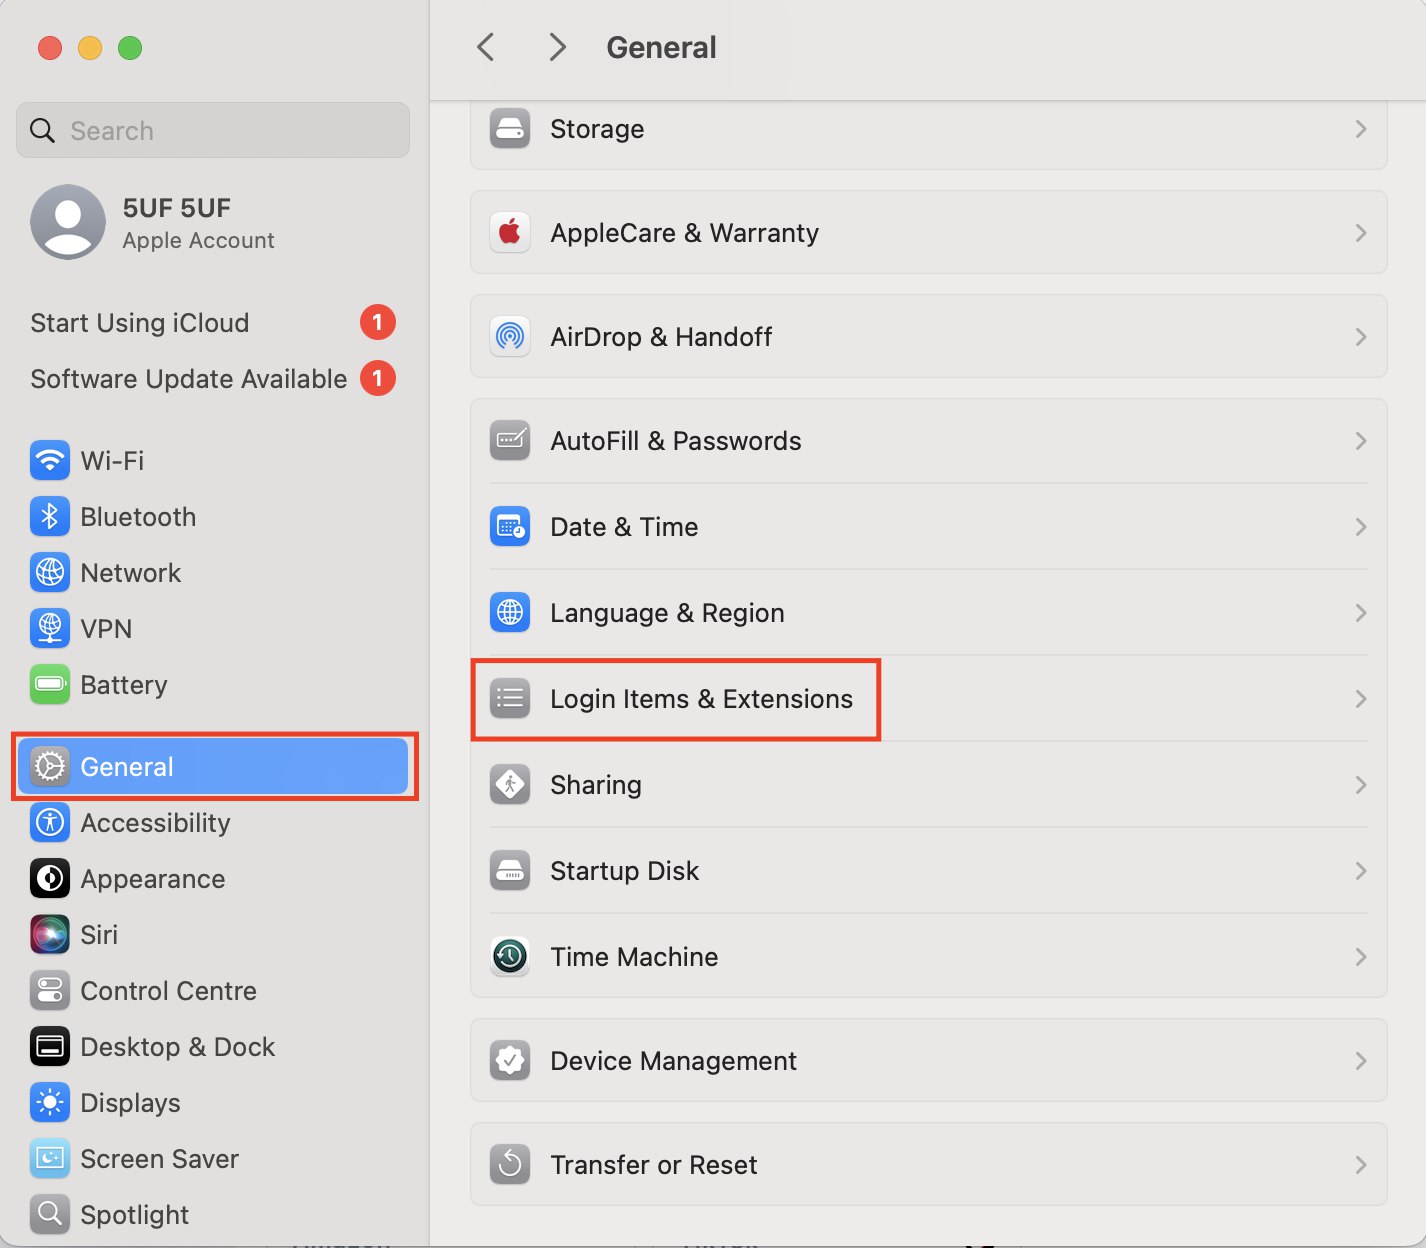
-
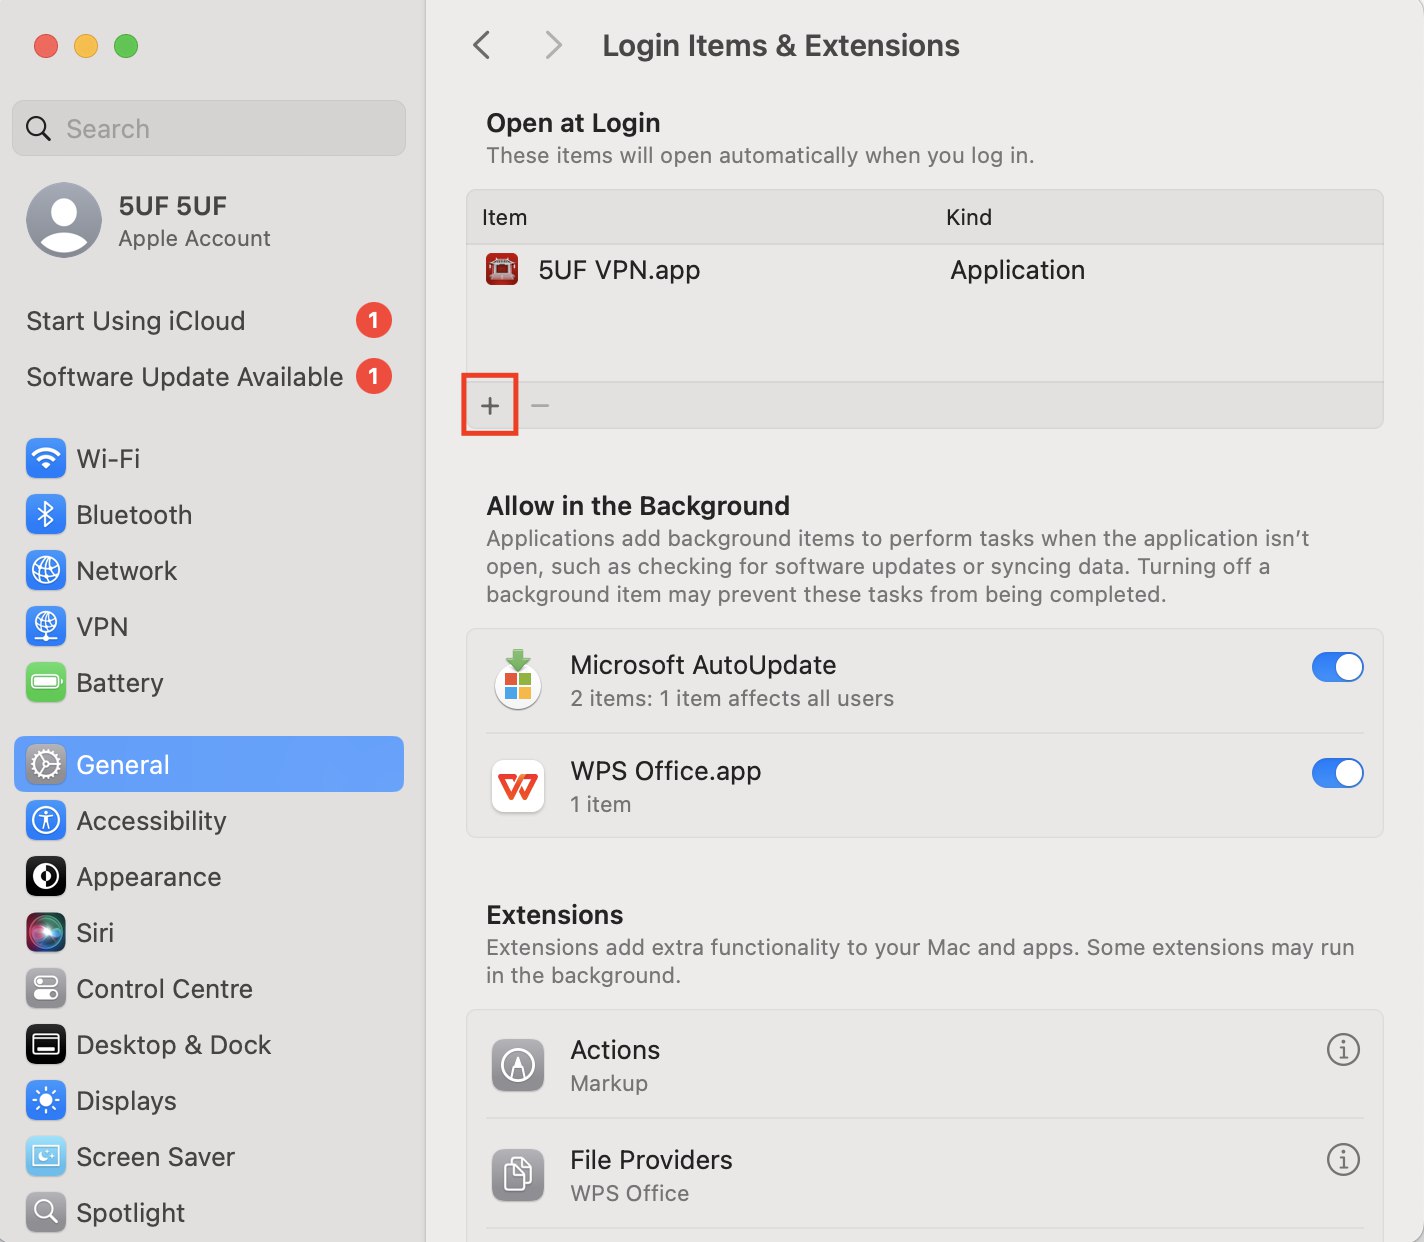
Click the + icon.
-
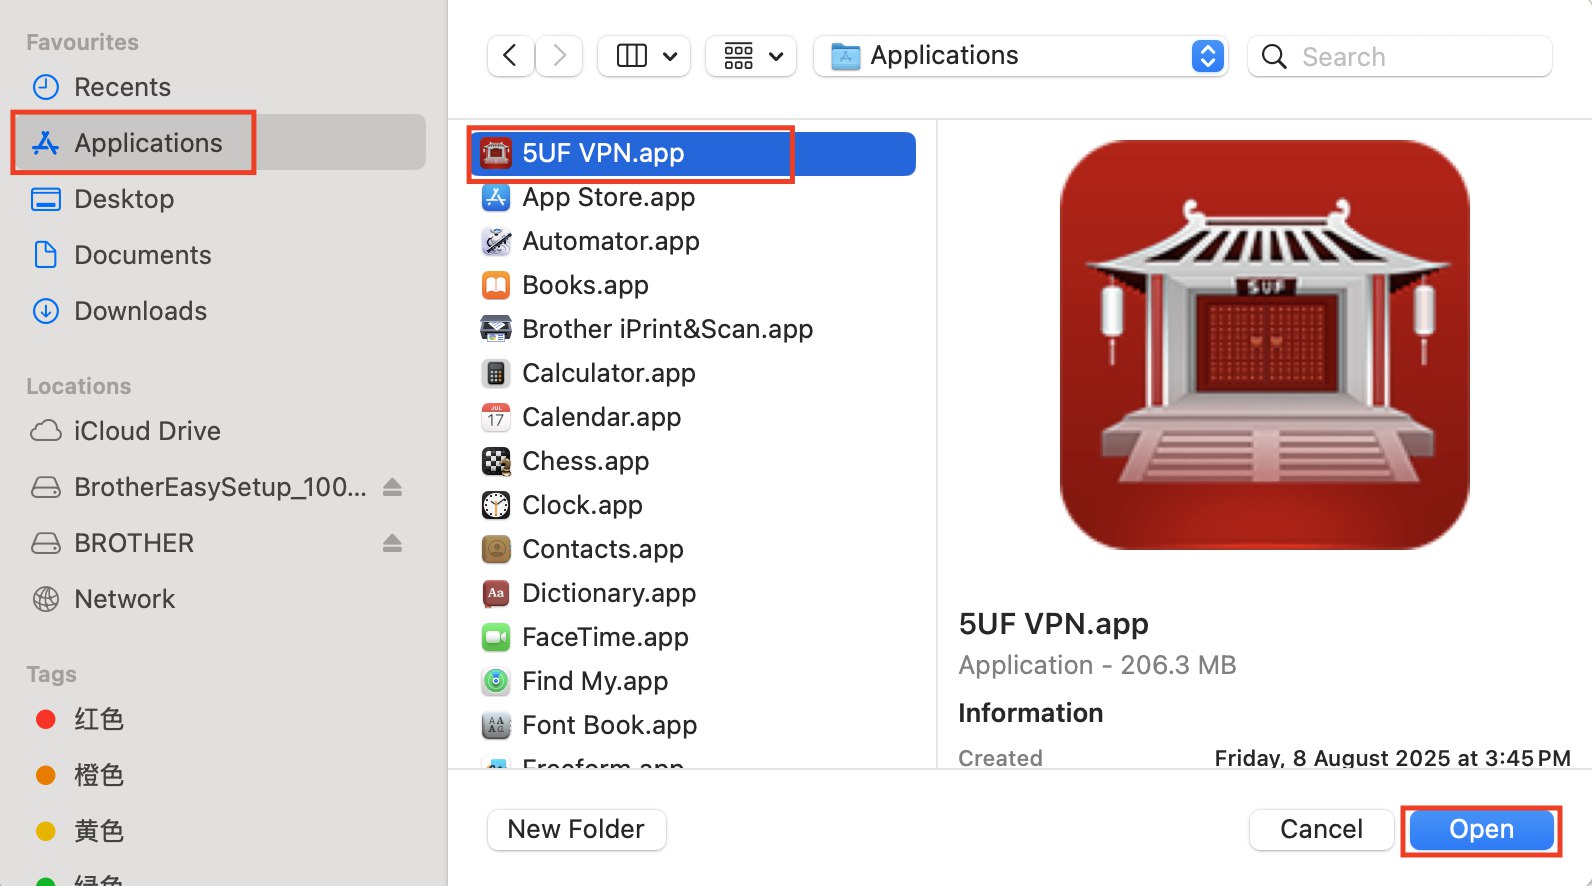
Select Applications.
-
Locate and select 5UF VPN.app.
-
Click Open to add it to your startup applications.
Open System Settings → General → Login Items & Extensions.
Click the + icon.
Select Applications.
Locate and select 5UF VPN.app.
Click Open to add it to your startup applications.
How to confirm which Linux file is suitable for you
Step 1: Identify Your Linux Distribution and System Architecture
-
Determine Your Linux Distribution
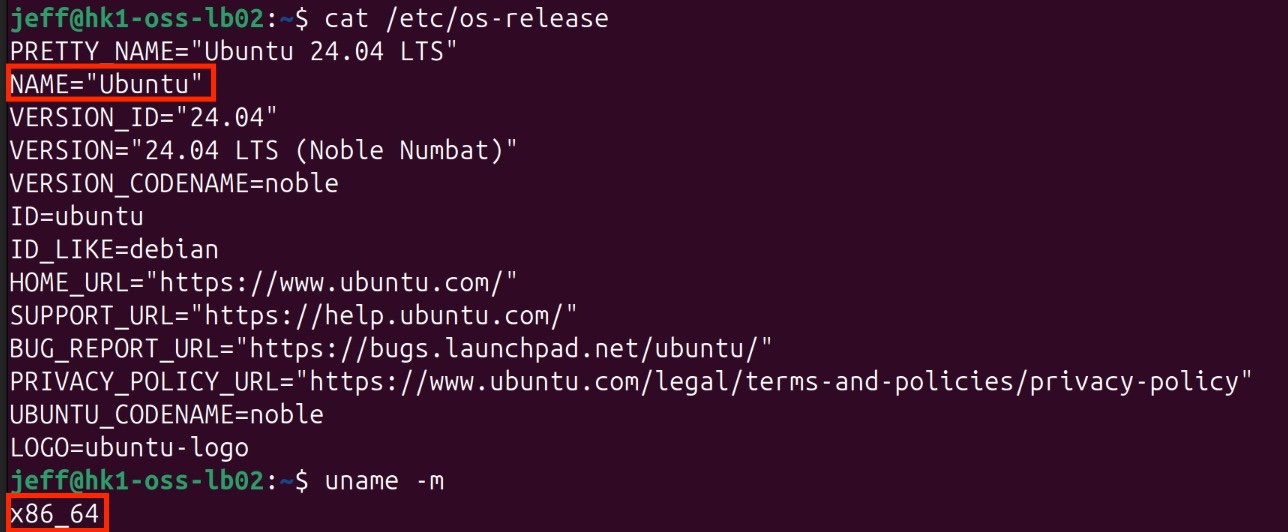
Open the terminal and execute:
cat /etc/os-release
This displays information about your Linux distribution.
-
Check Your System Architecture
Run:
uname -m
-
Output x86_64: your system uses a 64-bit Intel/AMD processor — download linux-amd64 packages.
-
Output aarch64: your system uses a 64-bit ARM processor — download linux-arm64 packages.
Step 2: Access the Download Page
Visit https://www.5ufclub.com/news/vpn/id/11168/
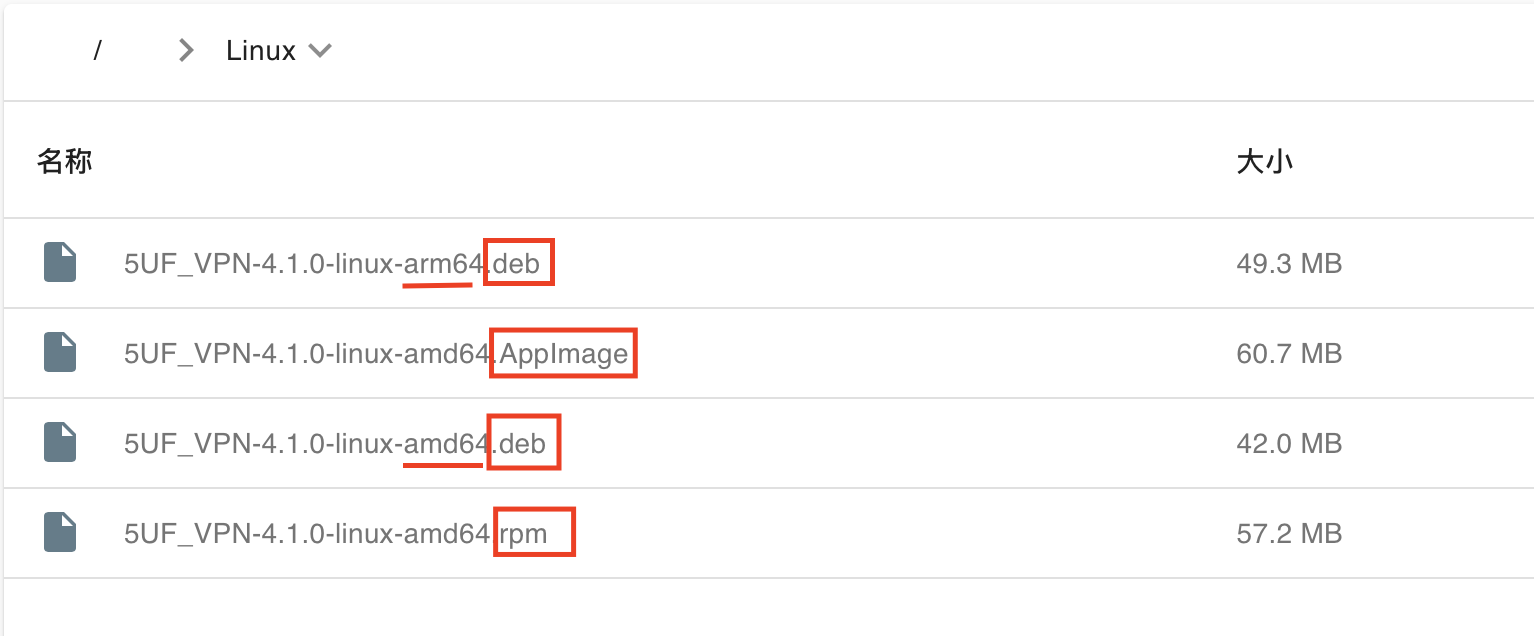
Step 3: Select and Download the Appropriate Linux Package
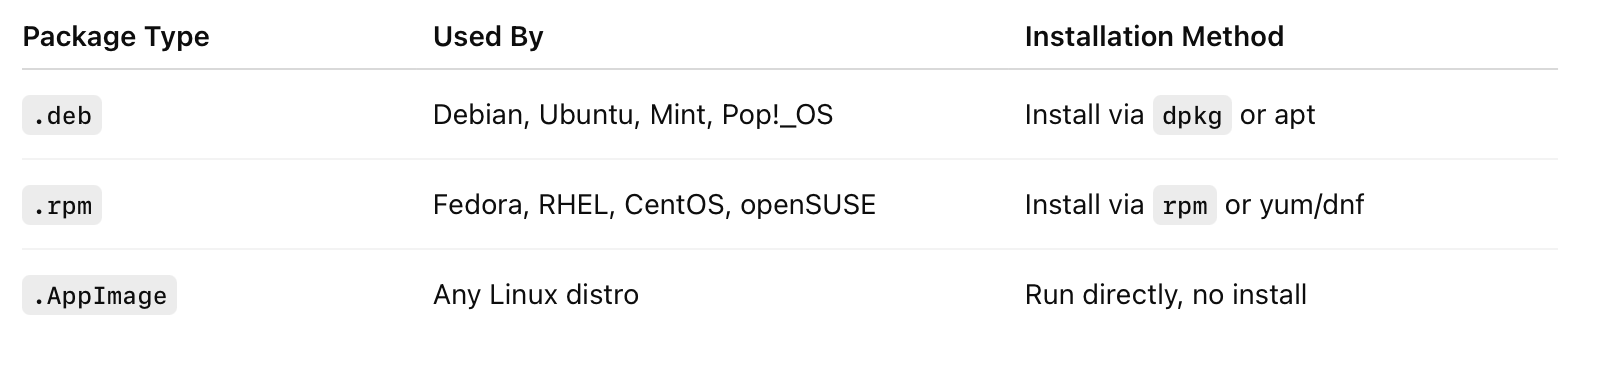
On the website, choose Linux as your platform. Review the available package formats — .deb, .rpm, .appimage — and select the one compatible with your Linux distribution and preference. Then, download the package matching your system architecture (amd64 or arm64).
How to confirm your Windows processor
Step 1: Verify Your Processor Architecture
For Windows Users
-
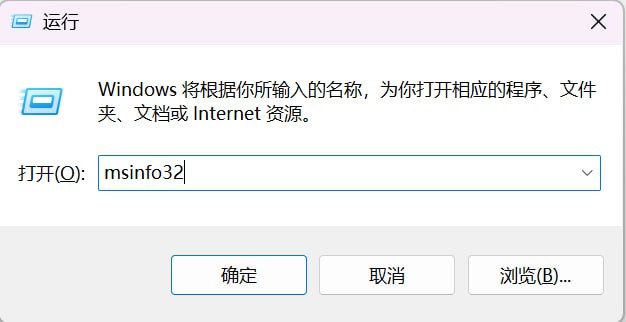
Open System Information
Press Windows + R, type msinfo32, and hit Enter.
-
Check System Type
-
If System Type shows “x64-based PC”, your processor supports AMD64 (x86-64) and is compatible with the standard Windows AMD64 version.
-
If System Type shows “ARM-based PC”, your device runs on an ARM processor and supports Windows ARM64.

Step 2: Access the Download Page
Open System Information
Press Windows + R, type msinfo32, and hit Enter.
Check System Type
If System Type shows “x64-based PC”, your processor supports AMD64 (x86-64) and is compatible with the standard Windows AMD64 version.
If System Type shows “ARM-based PC”, your device runs on an ARM processor and supports Windows ARM64.
Visit: https://www.5ufclub.com/news/vpn/id/11168/
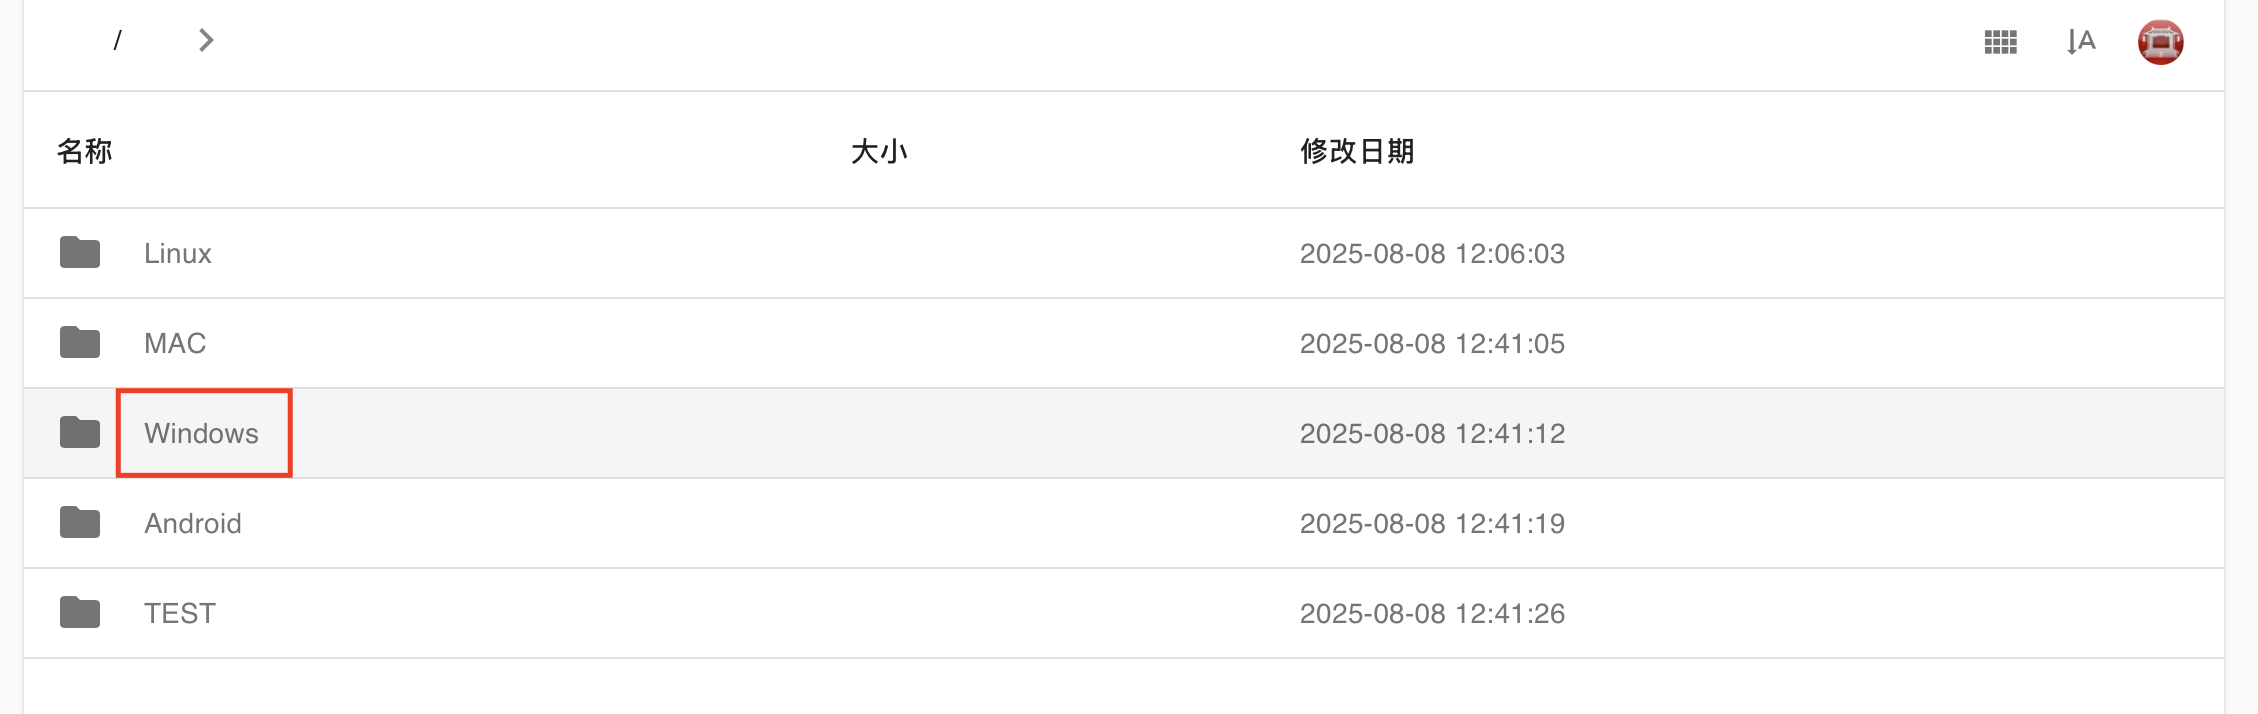
Step 3: Select Your Platform
On the website, select Windows from the list of platforms.
Step 4: Download the Correct Version
-
For x64-based PCs, download the AMD64 version.
-
For ARM-based PCs, download the ARM64 version.

How to confirm your Mac processor
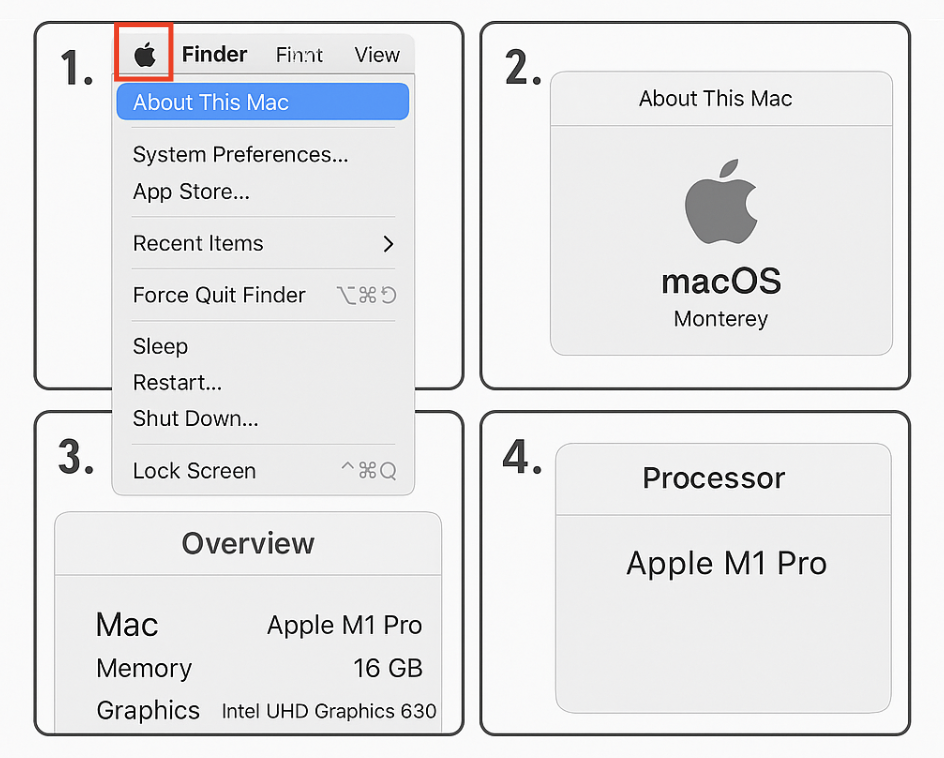
Steps to Download the Correct Version for macOS
-
Determine Your Mac’s Processor Type
-
Click the Apple menu () in the top-left corner of your screen and select About This Mac.
-
Under Chip or Processor, identify whether your Mac uses Apple Silicon (e.g., M1, M2, M3) or Intel.
-
-
Access the Download Page
-
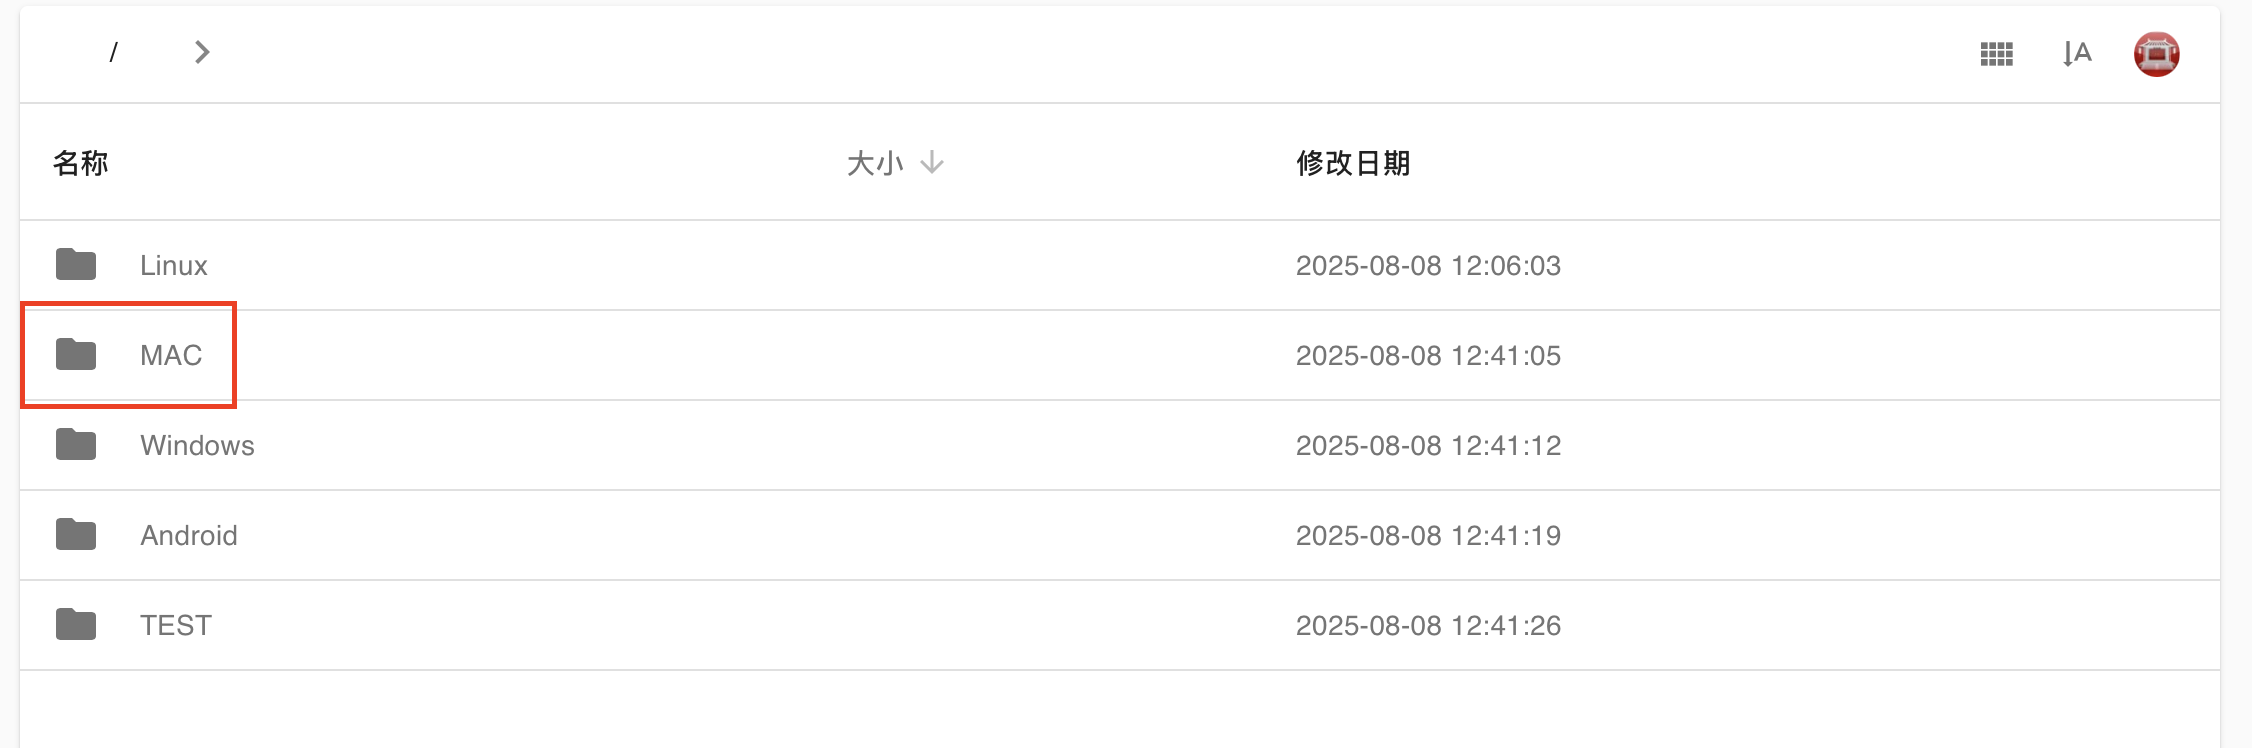
Select macOS as Your Platform
-
On the website, choose Mac from the list of available platforms.
-
-
Download the Appropriate Version
-
For Apple Silicon (M1, M2, M3) — select the ARM64 version.
-
For Intel-based Macs — select the Intel x86_64 version.

-
What is SNI spoofing and why do I need it?
SNI spoofing replaces the actual domain with a “safe-looking” one (like bing.com) during TLS handshake to bypass domain-based restrictions. Useful when VPN access is blocked.
Does SNI spoofing work in all network environments?
Not always. Some advanced networks inspect TLS fingerprints or certificate data. SNI spoofing improves success rates but is not guaranteed.
Can SNI spoofing help save mobile data?
Some mobile carriers offer zero-rated data for specific domains (e.g., music or video apps). SNI spoofing may help you benefit from these packages.
Can I choose a custom spoofed domain?
YES.
Will SNI spoofing affect the VPN server I’m connecting to?
No. This only affects the domain name in the handshake phase. Your real traffic still goes to the selected VPN server.
What is SNI spoofing and why do I need it?
SNI Spoofing (Domain Disguise) Feature Guide
🛡️ SNI Spoofing (Domain Disguise) – Feature Overview
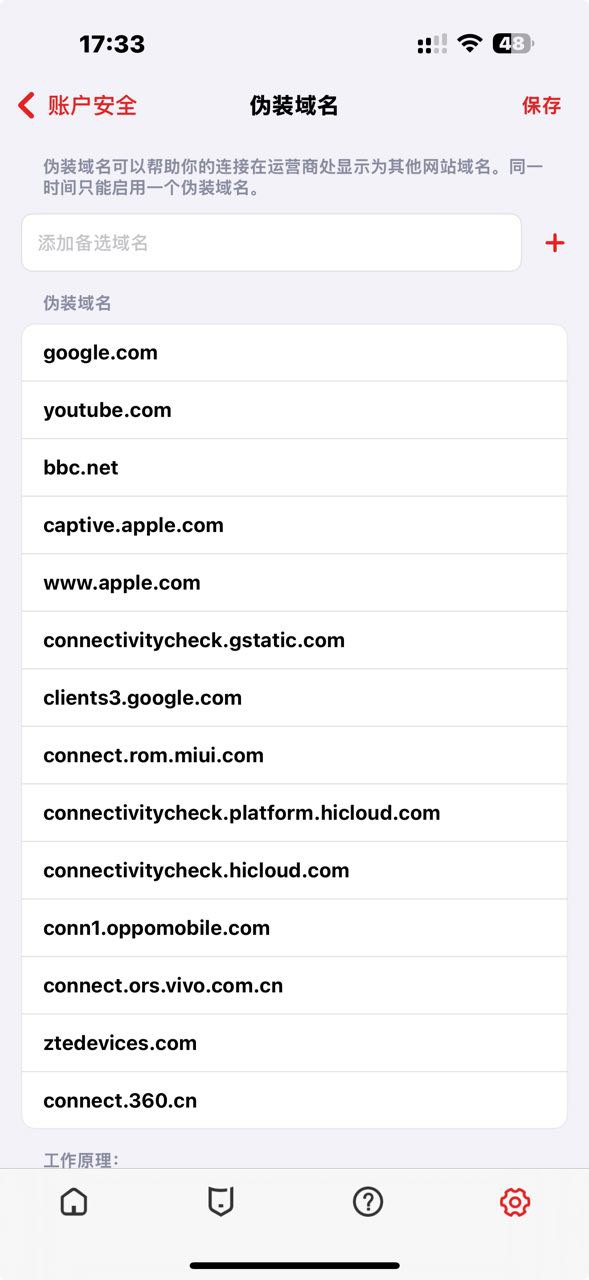
Where to find it:
Settings → Account Security → Domain Spoofing
Supported Versions:
-
iOS 8.0 and above
-
Android 3.0 and above
🔍 What is SNI?
SNI (Server Name Indication) is part of the TLS/SSL protocol. When your device connects to a website using HTTPS, it sends the domain name in plaintext at the very beginning of the handshake.
This means that firewalls, network providers, or censorship systems can see which website you’re trying to visit, even if your connection is encrypted.
🧪 How SNI Spoofing Works
With SNI spoofing enabled, 5UF VPN replaces the real domain name (e.g., realvpn.example.com) with a harmless and widely accepted domain (e.g., bing.com, baidu.com) during the TLS handshake.
The goal is to deceive censorship or firewall systems that block access based on SNI data, allowing the connection to go through.
✅ This spoofing only affects the initial handshake. Your real VPN session and traffic are not affected or rerouted.
🌍 Typical Use Cases
|
Situation |
Recommended |
Description |
|---|---|---|
|
VPN access blocked in China |
✅ Yes |
Helps bypass domain-based GFW restrictions |
|
Public Wi-Fi in schools, offices, hotels |
✅ Yes |
Circumvents SNI-based restrictions |
|
Captive portals in airports or malls |
✅ Yes |
Tricks login systems into allowing access |
|
Mobile data plans with limited domains (e.g., music/video streaming) |
✅ Yes |
Mimics “zero-rated” domains to save bandwidth or avoid throttling |
|
Normal, unrestricted networks |
❌ Not needed |
Adds connection time without benefit |
⚠️ Important Notes
-
Recommended spoof domains include popular sites like baidu.com, bing.com, and apple.com
-
Not all protocols support SNI spoofing. For example, QUIC/HTTP/3 may not be compatible. Consider switching to TCP mode in Advanced Settings.
-
Some VPN servers may reject connections if the SNI domain does not match their TLS certificate. If connection fails, try turning the feature off and reconnect.
❓ Frequently Asked Questions (FAQ)
Q1: What is SNI spoofing and why do I need it?
SNI spoofing helps you bypass firewalls by replacing the domain name in your TLS handshake with a commonly allowed domain. This is useful when VPN connections are blocked by domain name.
Q2: Does this change the VPN server I’m connecting to?
No. The real connection still goes to the VPN server you selected. Only the domain used in the TLS handshake is disguised.
Q3: Can I choose a custom spoofed domain?
Yes. The system predefines some common domain names, such as the domain name used to detect available Wi-Fi links in IOS.
Q4: It doesn’t work on my school or office network. What should I try?
Try enabling TCP mode instead of UDP in Advanced Settings. Some networks block or inspect UDP packets more aggressively.
Q5: Can this help me use zero-rated data plans from my carrier (e.g., music streaming)?
Yes, in some cases. If your ISP allows free access to specific services by domain name, SNI spoofing can trick the system into treating your connection as part of that service.
Q6: Does SNI spoofing work in all cases?
No. Some networks perform deeper inspection or block based on other handshake details. SNI spoofing improves success rate but is not guaranteed in every environment.
No response when tapping Connect in the app
If nothing happens after you tap Connect, the system VPN permission may not have been created correctly, or the old local configuration may be damaged.
Try the following steps:
- Completely close the 5UF app.
- Open system settings and remove any old VPN profile or configuration.
- Open the 5UF app again, tap Connect, and allow the system to create the VPN.
- If you previously denied the permission, restart the device and try again.
- If it still does not work, update to the latest version of the app. Reinstall if necessary.
We recommend using the latest app instead of older clients. The latest version has better permission guidance and compatibility.
How Android use 5UF club V2rayNG

1.下载
从 Google Play 下载应用。
https://play.google.com/store/apps/details?id=com.v2ray.ang&hl=zh&pli=1
如果不能使用 Google Play,请手工下载:
https://github.com/2dust/v2rayNG/releases
备用下载地址:
“v2rayNG_1.9.43_arm64-v8a.apk”
Backup download 2
2.从网站复制订阅配置文件,导入到 APP 中,如下图:
https://www.5ufclub.com/xray_config
要选择 N2rayNG 专用的配置地址。
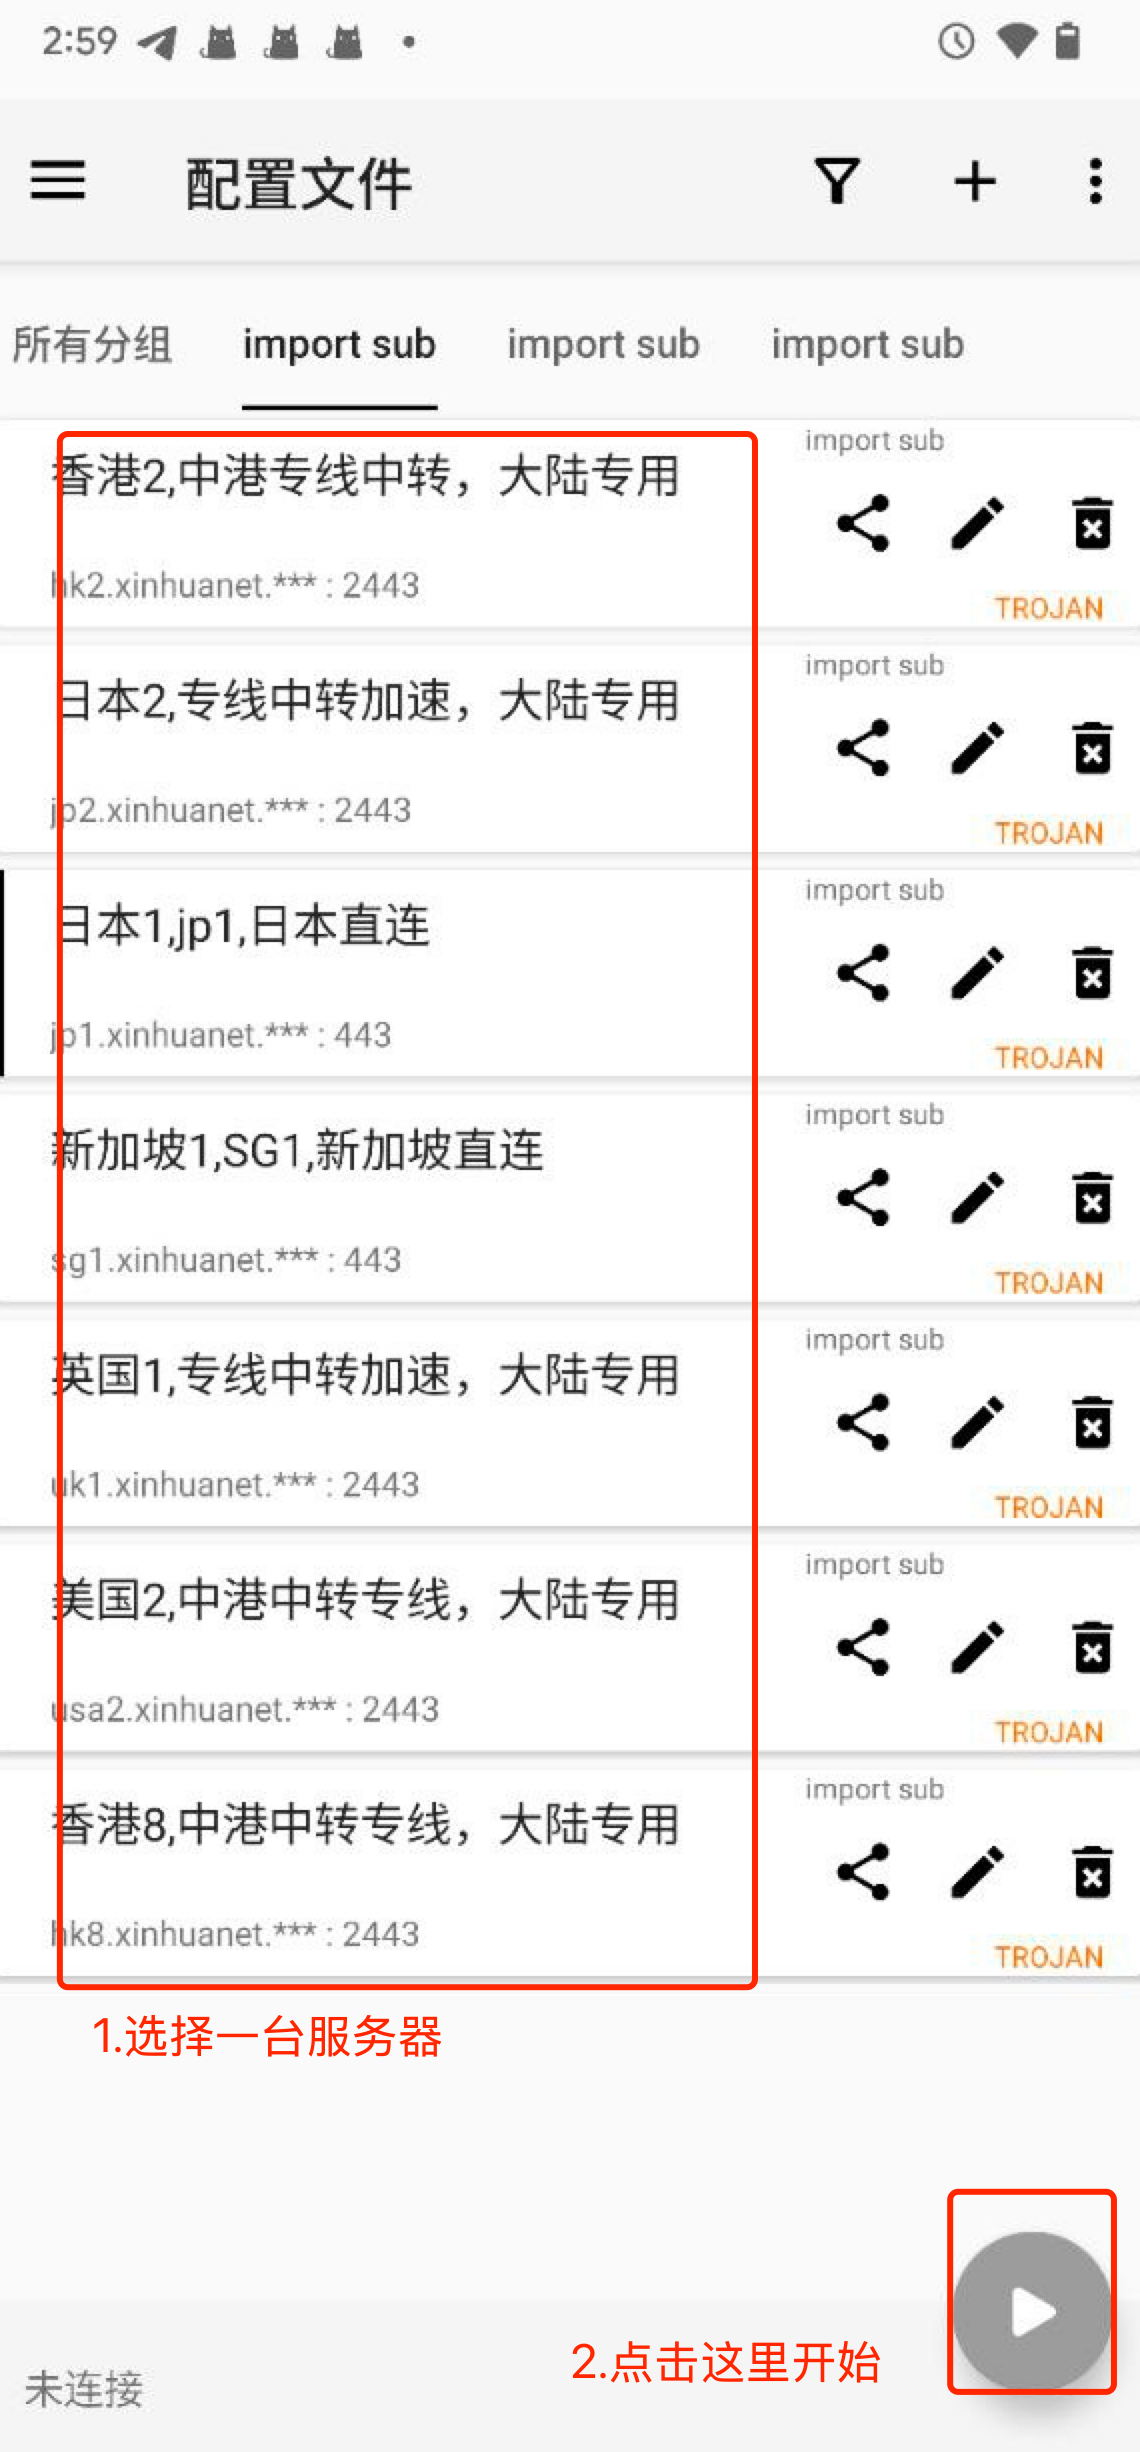
3.开始使用。
点击类似于“播放”这个按钮开始加速。如下图。
高级用法:
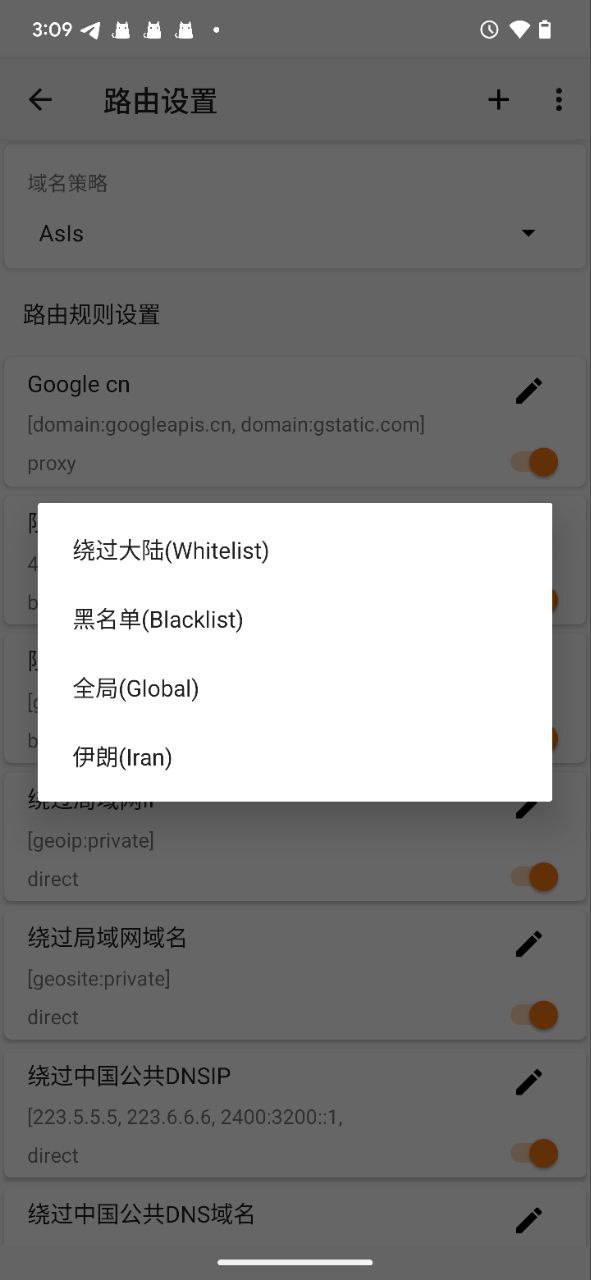
点击路由设置,更多(...)导入预定义规则集。
选择“绕过大陆”,可以配置中国大陆的通用规则,只加速国外的 IP,如下图。
How to use Trojan (XRay) with windows
1. 下载客户端并安装
Clash for Windows
https://dl.clashforwindows.org/releases/latest/Clash.for.Windows.Setup.0.20.39.exe
更多其它端也可以在这里找:
https://dl.clashforwindows.org/releases/latest/
备用下载点:
Clash.for.Windows.Setup.0.20.39.exe
2. 点击导入
从我们的网站上获取订阅地址
https://www.5ufclub.com/xray_config
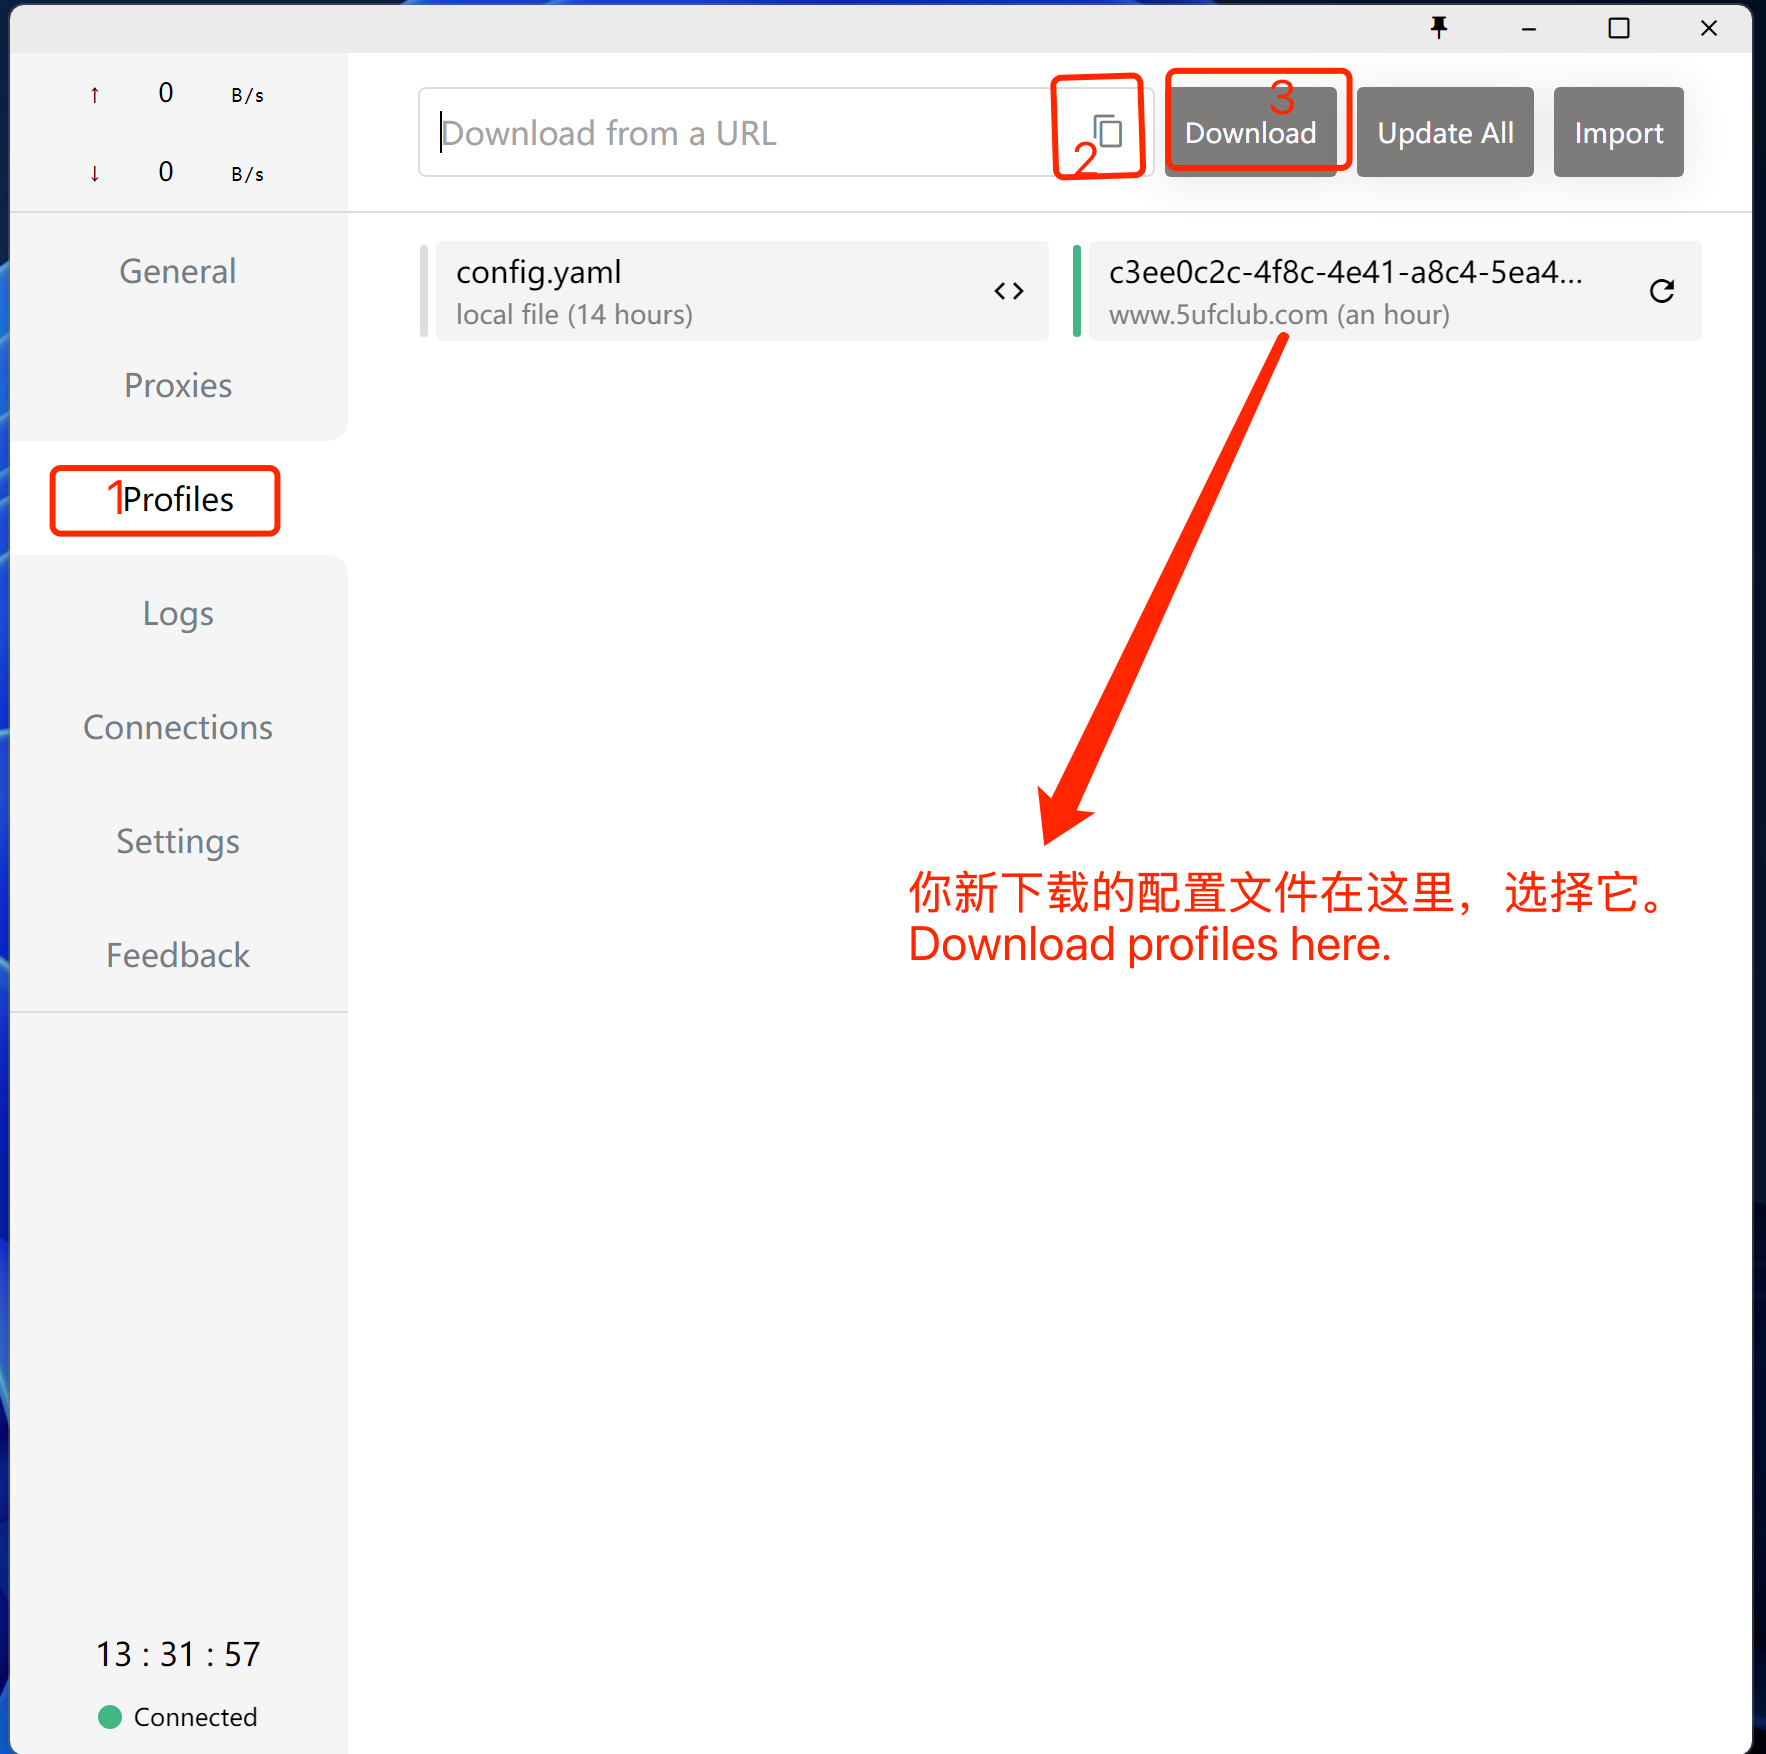
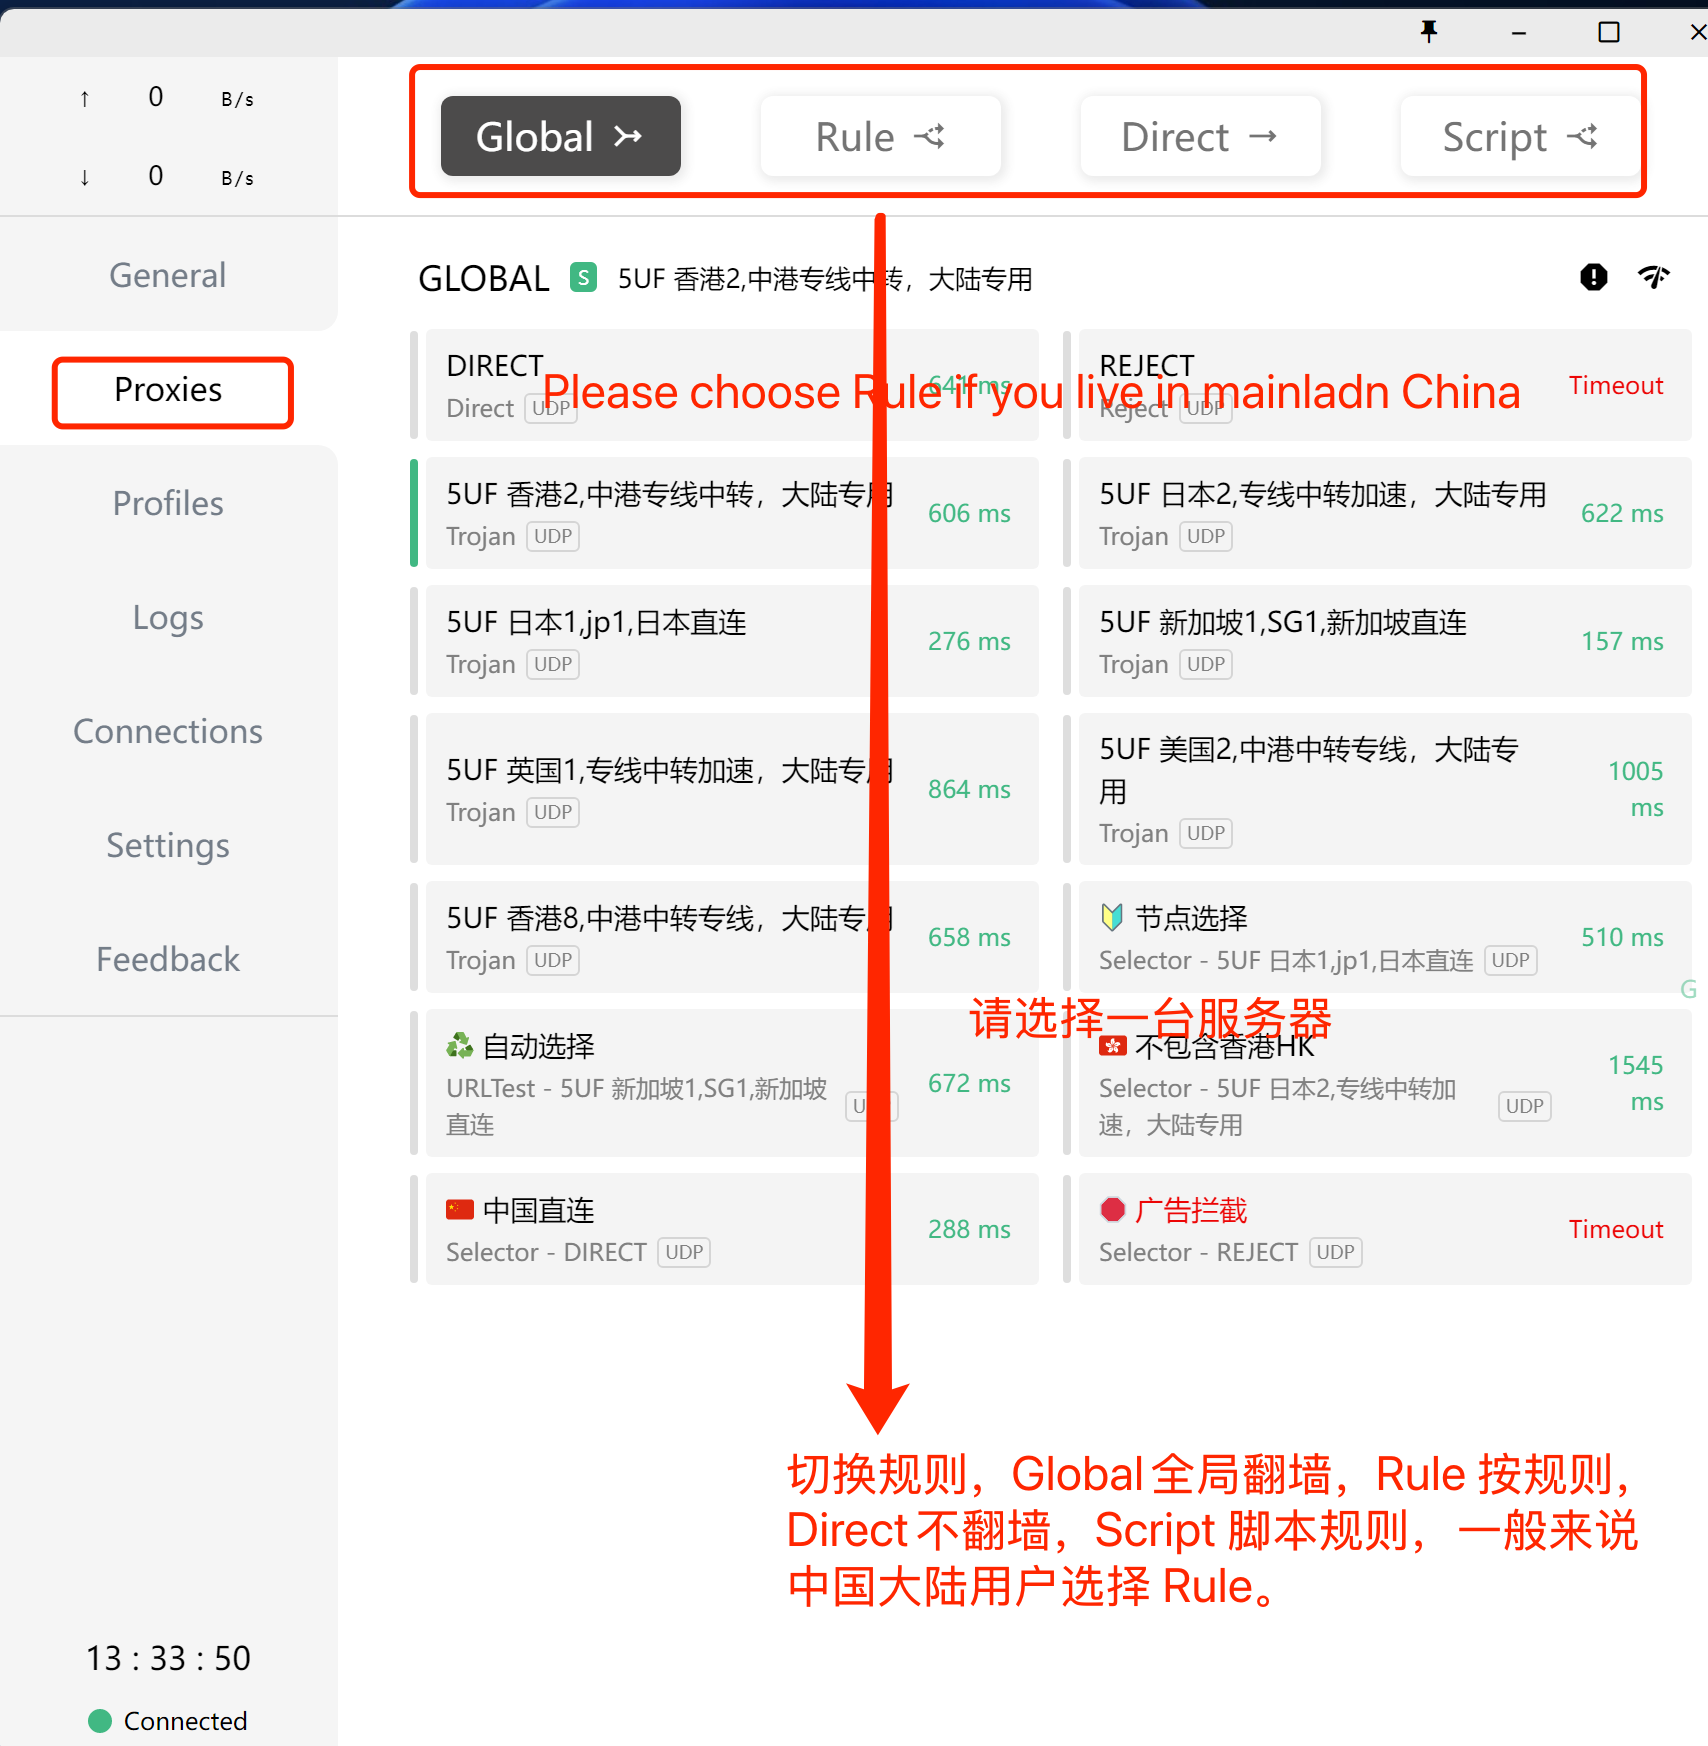
3. 使用
选择刚下载好的规则(如上图),选择好服务器(如下图),打开系统代理(下下图),开始使用。
打开系统代理,如下图:
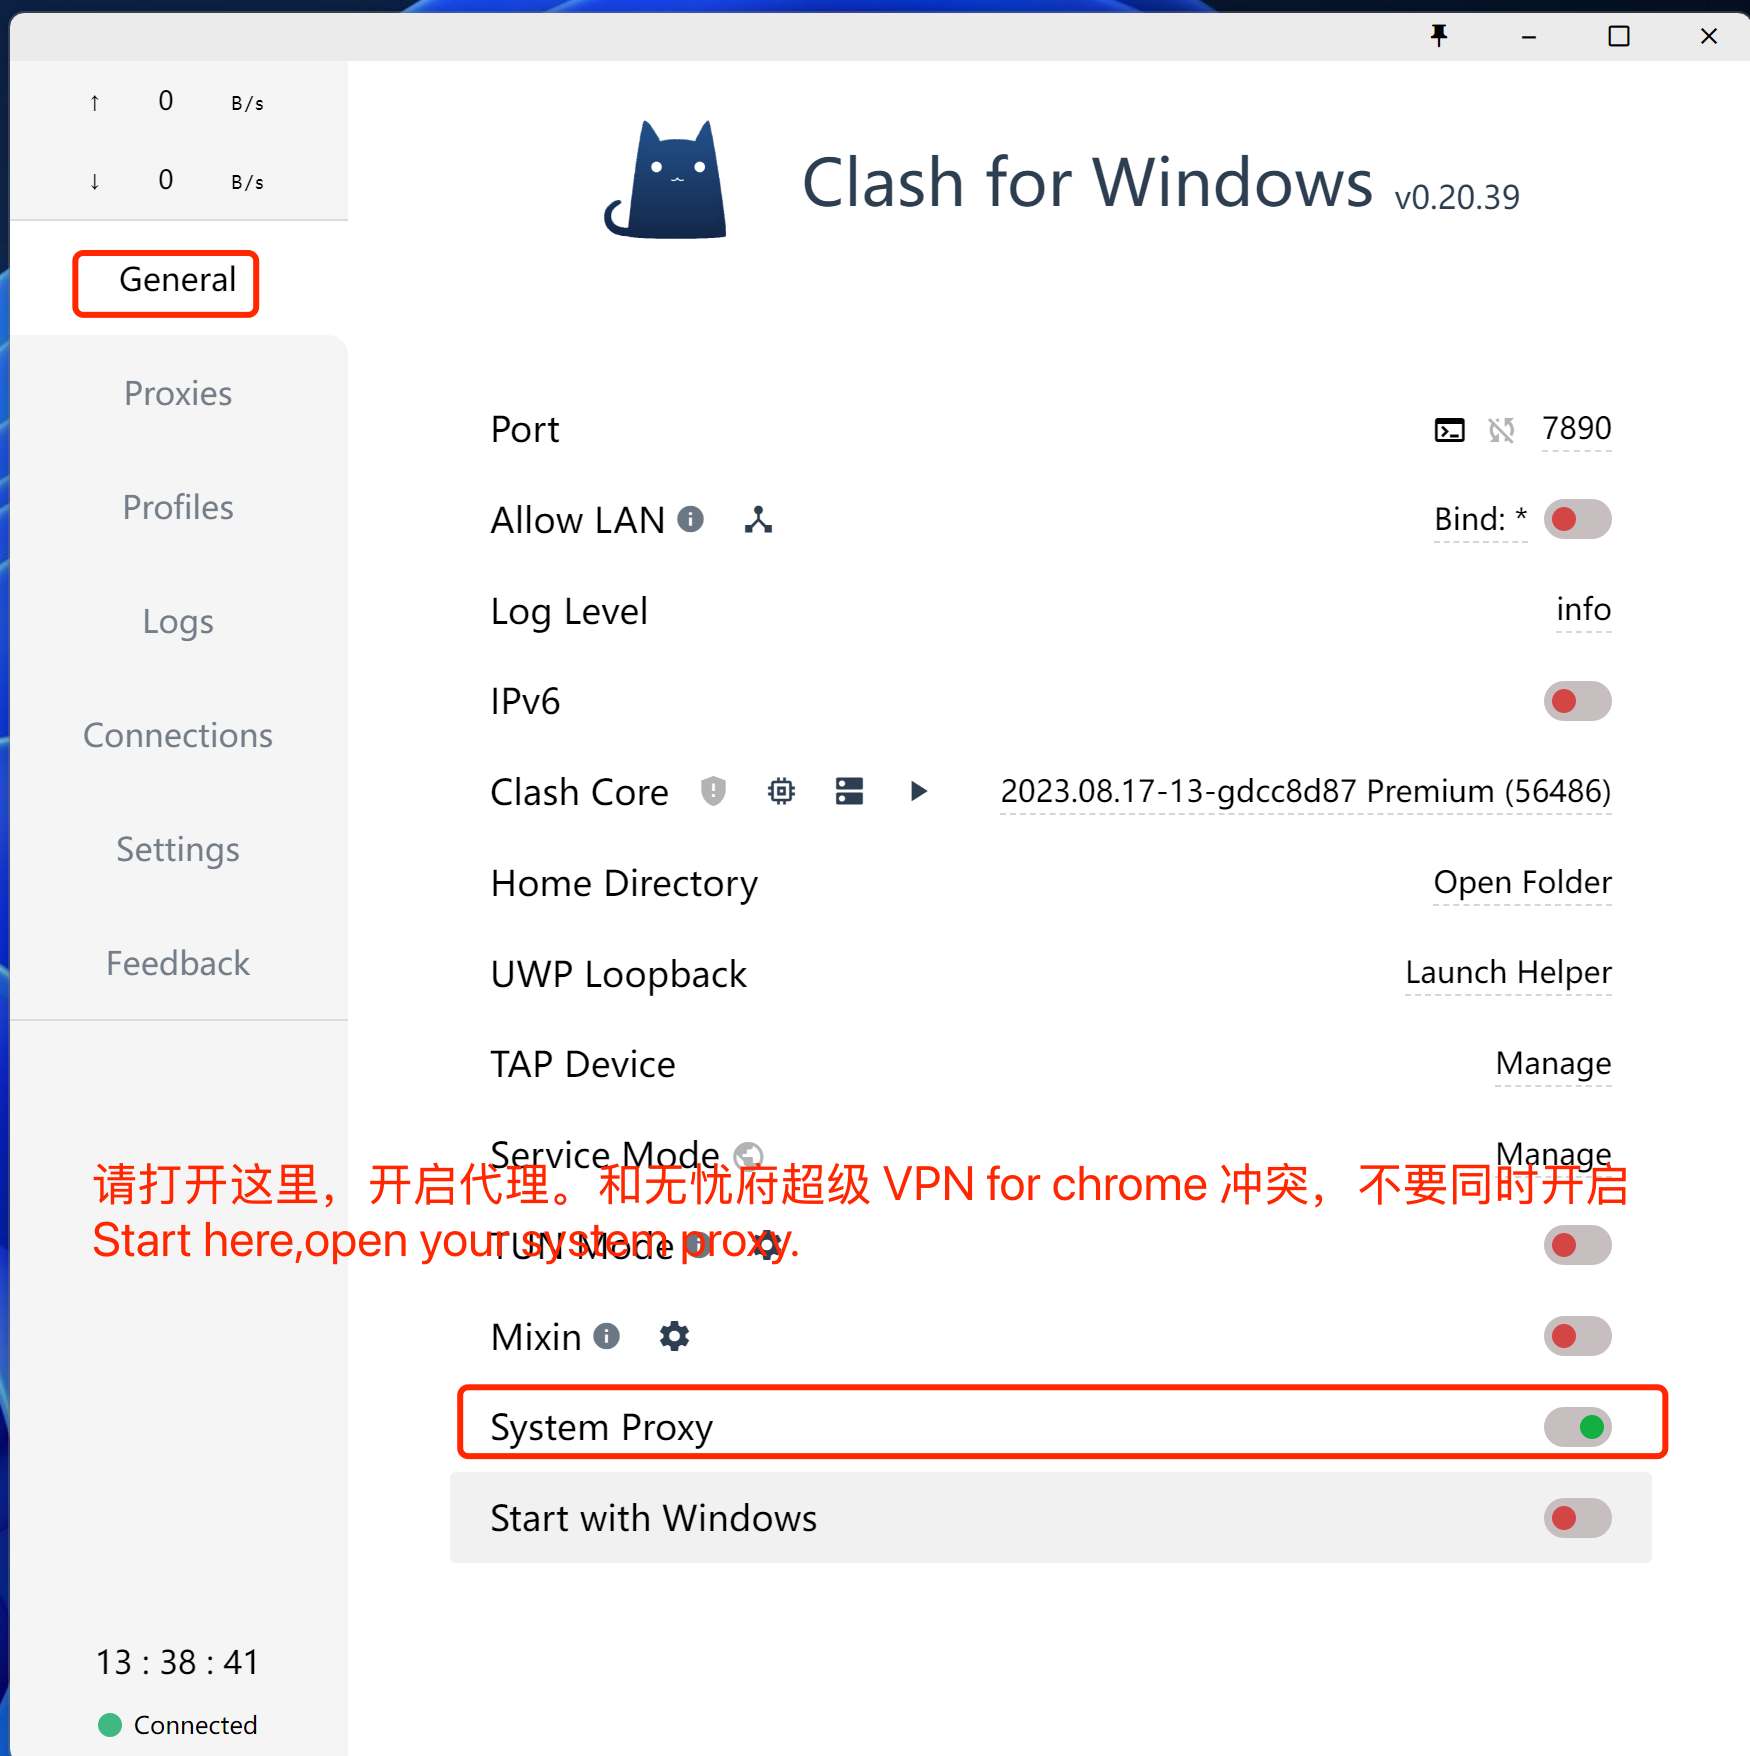
注意事项,如果你的浏览器同时使用无忧府超级 VPN for Chrome 插件时,这里的代理会失效,同理,其它代理类的软件都不能同时生效,你要先禁用插件,或者换一个浏览器。
打开网址:https://ip111.cn